The tools and plugins recommend in the site are the ones we use, have tried or tested ourselves and recommend to our readers. Marketing With WP is supported by readers like yourself. If you take an action (such as a purchase) we might earn an affiliate revenue at no extra cost to you.
How to Setup and Configure WordPress Website to get more visitors
WordPress is one of the most SEO-friendly Content Management Systems to build a website.
For many years WordPress was used for blogging. However, in the past few years, it has evolved into a CMS that is loved by large corporations, startups, individuals, artists, bloggers, marketers, and more.
It is loved because it is SEO-friendly and easy to use. WordPress is one of the most flexible platforms in its class, which means you can do a lot with it.
After years of working in WordPress and improving countless websites, I made a personal list of things I check every time.
This blog is the list of important things that I set up and configure to get the most out of a WordPress website.
Establish Site Identity and Branding –
Your website is your business’s online identity. Therefore, it needs to provide a clear picture of who you are, what products/services you offer, and who is your customer.
The following is a list of changes that we recommend which will help you establish consistent branding and identity on your WordPress website.
1. Setup site title, tagline and time zone
The Site Title and Tagline are your site’s identity, thus it is the most essential item to set up after installing WordPress. It provides a quick overview of your site.
Most importantly – your site’s Title is used by Search Engines to build digital relationships with your business (such as Name, Address, and Phone number) and create online connections/relationships to other digital entities such as Social Media Channels, News Articles where you are featured, etc.

These can be done inside WordPress General Settings.
To set up the site title, tagline, and time zone, Go to Settings > General
You can change the site title, tagline, and timezone and then click Save.
2. Upload Favicon and Site Logo
Favicon and Site Icon provides a visual introduction and identity to your website. It is one of the most important visual branding elements for your website. This can be done in Theme Customization.
Visual branding elements provide a quicker brand recall and association to your website.
To change the favicon and site logo, Go to Appearance > Customize > Site Identity
Make changes and then Click Publish
The location of site identity, favicon, and site logo might be different depending on the theme
3. Setup Front Page and Blog Pages
The Frontpage or Home Page – is the most important page on your website. It provides users a quick glance at your brand, product, and services.
In terms of Search Engine Optimization – the home page is usually the most authoritative page. Pages and Posts on your website get crawled faster by search engines if they are directly linked from the Home Page.

To set up front page and blog pages –
Go to Settings >> Reading >> Select – “A Static Page” >> Choose your Homepage and Posts page
We also have a detailed guide on WordPress Reading Settings that helps you setup your home page and blog page.
Moreover, make sure to create must-have pages in your WordPress website such as About Us, Contact Us, Testimonials, FAQ, etc.
4. Delete Default Content
WordPress on installation comes with the default contents – “Sample Page”, a “Hello World” blog post, and a “Hi! This is a comment” comment.
We recommend removing the default content to make your website look professional and polished.
The default contents can be deleted by –
Sample Page: Go to Pages >> Click the delete option for “Sample Page”
Hello Word Post: Go to Posts >> Click the delete option for “Hello World”
Hi! This is a comment: Go to Comments >> Click the delete option for “Hi! This is a comment”
5. Setup a default category (post category)
WordPress by default comes with a default category “Uncategorized”. Having this default category is a straight giveaway that your website is not organized for your visitors.
Moreover, an “Uncategorized” category does not really help your readers understand the context of the page or post content on the website.
We recommend renaming the Uncategorized category to something that your blog posts will frequently cover.
To rename the default uncategorized category –
Go to Posts >> Category >> Select – “Uncategorized” >> Change name and slug to a relevant topic for your website
Check out our guide on WordPress Writing Settings to change the default WordPress category.
6. Install your WordPress theme
There are free and paid WordPress themes that can define your website’s visual appearance as well as the overall functionality.
For simple blogging websites, the default theme by WordPress is a fast and lightweight solution.
Don’t know where to start? Here is our list of most popular Free WordPress Themes.
Additionally, Themeforest.com and TemplateMonster.com provide a wide range of premium WordPress Themes with varying designs and functionality. You can easily purchase a theme and set up the theme in your WordPress site within minutes.
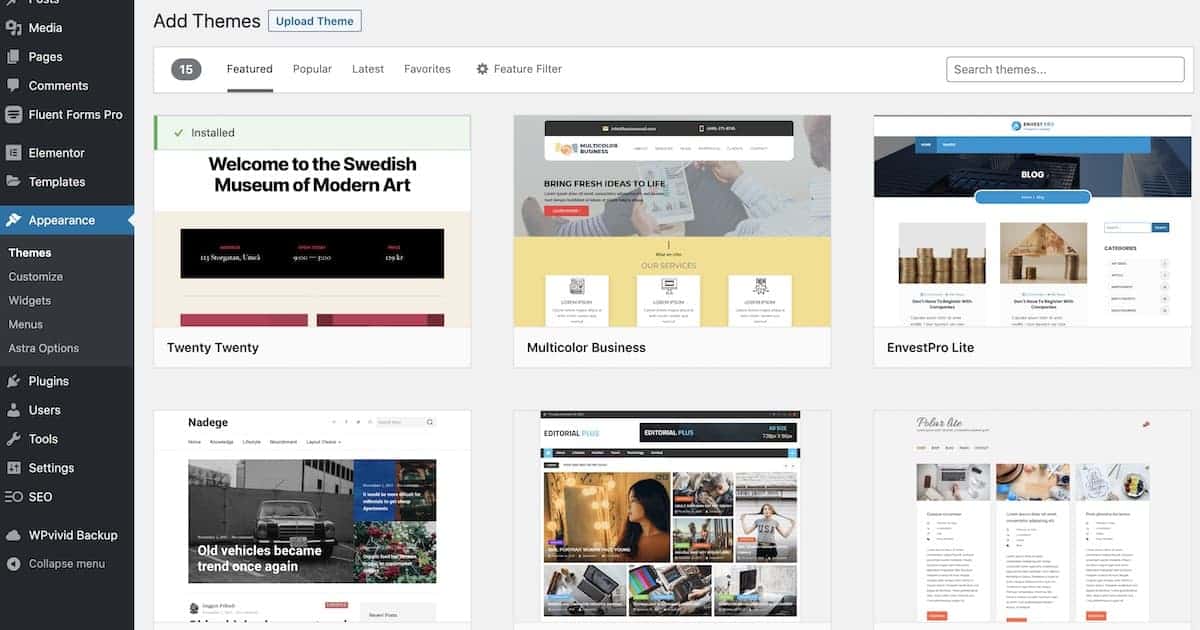
To install a theme and change a theme –
Go to Appearance >> Themes >> Add New >> You can either search, select or upload a new theme
Check out our detailed guide on Installing WordPress Theme.
7. Remove powered by WordPress
WordPress by default has a footer section that says “Powered by WordPress”.
One of the essential things to set up in WordPress for your brand to look professional and established is to remove powered by WordPress footer content.
It is fairly easy to remove the WordPress footer branding –
Go to Appearance >> Customize >> Footer >> Footer Bar / Footer Widgets >> Insert custom footer text.
The location of the footer option might be different depending on your theme
Setup Website Backup and Security –
As more websites get powered by WordPress Content Management System, more cases of malware injection and hacks are appearing.
According to WebArx, on average – 30,000 new websites are hacked every day
Vulnerable themes and plugins are responsible for the majority of the website’s malware injections and hacks.
To prevent your website from getting hacked or going offline, we recommend the following things to set up as a precautionary measure –
8. Activate Remote Backups
Backups are essential to minimize website downtime and provide users a seamless experience.
One way or the other, at some point of time – your WordPress website will experience –
- Plugin conflict
- Theme conflict
- Data loss
- Core WordPress update conflict
- Malware attacks and potential hacks
To restore your website back to full functionality – regular backups of your website and database is essential. Moreover, we recommend a regular “Offsite” backup, just in case your local WordPress installation is affected.
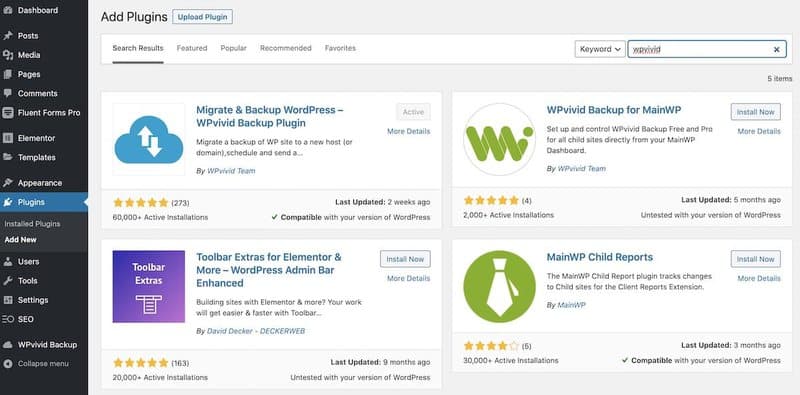
Luckily there are established plugins that can help you create remote backups of your website. Some of the most common WordPress website backup plugins are All-In-One WP Migration, WPvivid and Updraft Plus.

To Install BackUp Plugin and activate remote backups –
Go to plugins >> Add New >> Search For “WpVivid” >> Click Install >> Click Activate Go to Wpvivid Backup >> Backup & Migration >> You can select remote storage depending on whichever service provider you would like to use
We also have a detailed step-by-step guide to create backups for WordPress Website.
9. Delete Unused Plugins
Plugins require server resources and are also a primary cause of security vulnerability. Therefore, removing unused plugins is an essential setup activity after installing WordPress.
WordPress comes with default plugins such as Hello Dolly and Akismet. Furthermore, depending on your hosting provider, there might be other additional plugins such as All-In-One Migration or caching plugins installed by default. We recommend removing Hello Dolly and other unnecessary plugins.
To remove unused plugins –
Go to Plugins >> Select Plugins >> Deactivate Plugins >> Delete Plugins
10. Delete Unused WordPress Themes
Just like non-essential Plugins, unused Themes also are a common source of WordPress website’s vulnerability.
WordPress recommends having one of the default WordPress themes as a backup theme – which is okay. However, any additional and unnecessary themes should be removed.
To remove the unused themes…
Go to Appearance >> Themes >> Select Theme >> Click Delete Theme
11. Install WordPress Security
The proverbial saying “Prevention is better than Cure”, holds equally true when it comes to your WordPress website’s security.
Together with a good hosting provider, regular offsite backups, and good security plugins your WordPress websites can be secured from Malware and Unauthorized Access.
First and foremost – a good hosting provider has server-side security and a firewall to prevent websites from getting hacked. Additionally, the teams behind the security plugins regularly test commonly used plugins and detect anomalies in your website.
Some of the basic functionality of a good WordPress Security plugin is –
- changing the default admin login url
- locking out users from too many failed attemp
- prevent accessing and indexing core files and script such as wp-admin, wp-includes, wp-content
Malcare, BlogVault, VirusDie, WebArx, NinjaSecurity, Sucurri, or All In One Security are some of the most popular WordPress security plugins.
To install Security Plugins
Go to plugins >> Add New >> Search for Malcare >> Install Malcare >> Activate Malcare
12. Activate Spam Protection
What is more annoying than an empty inbox? Getting lots of spammy comments and contact form submissions emails.
Hackers utilize automated scripts to mass crawl websites and fill up contact forms to leave comments on WordPress Websites.
It gets annoying as well as messy receiving all the spam emails. Instead, outsmart the spammers and do yourself a big favor by installing a spam protection plugin.
Plugins like Akismet or Anti Spam Bee utilizes a honeypot mechanism to flag and prevent spammy comments and contact form submissions.
A honeypot is a contact form field that is not visible to the human eye, but spam bots can crawl the field. Basically, a spambot fills up the field in a contact form that human eyes cannot see. If the honeypot field is filled in, the anti-spam mechanism marks the form entry as spam.
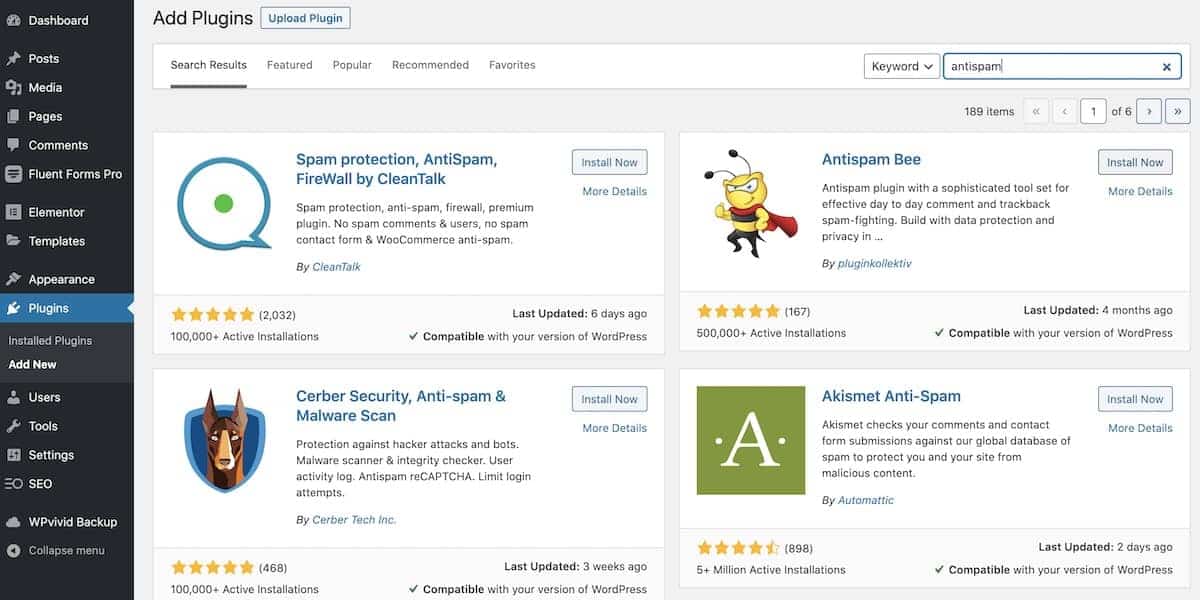
To install Anti Spam Bee
Go to plugins >> Add New >> Search for Antispam Bee >> Install Antispam Bee >> Activate Antispam Bee
13. Complete Your User Profile
WordPress by default shows your username as the author of blogs or comments.
To make your profile appear more professional we recommend completing your user profile with your full name and nickname.
Most importantly, we recommend entering a short bio of yourself to complete your user profile. It provides a human touch to your User Profile and makes your website and profiles authentic.
Some plugins even add extended functionality such as being able to include links to your website and social profile. These features are really helpful if your content are shared on Social Media that displays author tags.
To complete your user profile –
Go to Users >> Select the User >> Update relevant information
Check out our more in-depth article on editing user details.
14. Change WordPress Email Address
If your username is “Admin” or “Administrator”, we recommend creating a new administrator user with a different username.
Hackers usually utilize automated hacking scripts and as you might have guessed – admin/administrator is their go-to username.
Furthermore, it is essential to set the correct administrator email in your WordPress website. This is mainly because your WordPress website automatically sends an email to the administrator of the website if the website experiences any issues.
Setting up a new Administrator user or changing the email address is fairly simple.
Go to Users >> Select the User >> Update relevant information
Reminder: Please do not create a user that has “admin” or “administrator” as the username
Or read the in-depth article on WordPress general settings, which covers changing administrator email.
Setup Search Engine Optimization-
WordPress is one of the most SEO-friendly Content Management Systems (CMS) to host your website. The majority of webmasters host their websites on WordPress for ease of use and customization options.
Moreover, WordPress’s out of the box feature such as custom permalinks, easy metadata management, clean site structure and image optimization makes it search engine friendly.
Optimizing your WordPress for Search Engine Optimization focuses on two major components – On-Page SEO and Off-Page SEO. The overall objective is to focus on trust, reputation, authority, relevance, and user experience.
We recommend the following setup in your WordPress to make your website start ranking well in search engines –
15. Verify Search Engine Visibility
The most common reason why a WordPress website will not rank in Google is that the search engine visibility is turned off.
Indexing is the process where your site’s web pages are added to the search engines database. WordPress by default allows your website to be put in staging mode (development mode) by giving you the option to not allow search engines to index the site.
If you have the option to not index your website enabled – search engines will not put your website in search results.

To enable Search Engine Visibility and allow search engines to index your websites –
Go to Settings >> Reading >> Uncheck – Discourage search engines from indexing this site
Check out our article on WordPress Reading Settings for a step-by-step walkthrough of the Reading settings.
16. Configure Permalinks
A permalink is the permanent web address for your website’s content that is followed after your domain name. The URL to each post/page should remain permanent and never change — hence the name permalink.
Choosing the right permalink structure is one of the most essential things to set up after installing WordPress.
Page Title, Description, and the URL provide a quick preview of the content. Moreover, having a proper URL structure might impact the Click Through Rate of visitors clicking on the link to visit your website.
Caution: Only change your permalinks if it is a relatively new website. Otherwise, changing link structure will break your internal linking resulting in 404 errors – page not found.
By default, WordPress displays permalink in yourwebsite.com?p=123 format. This is neither organized nor helpful.
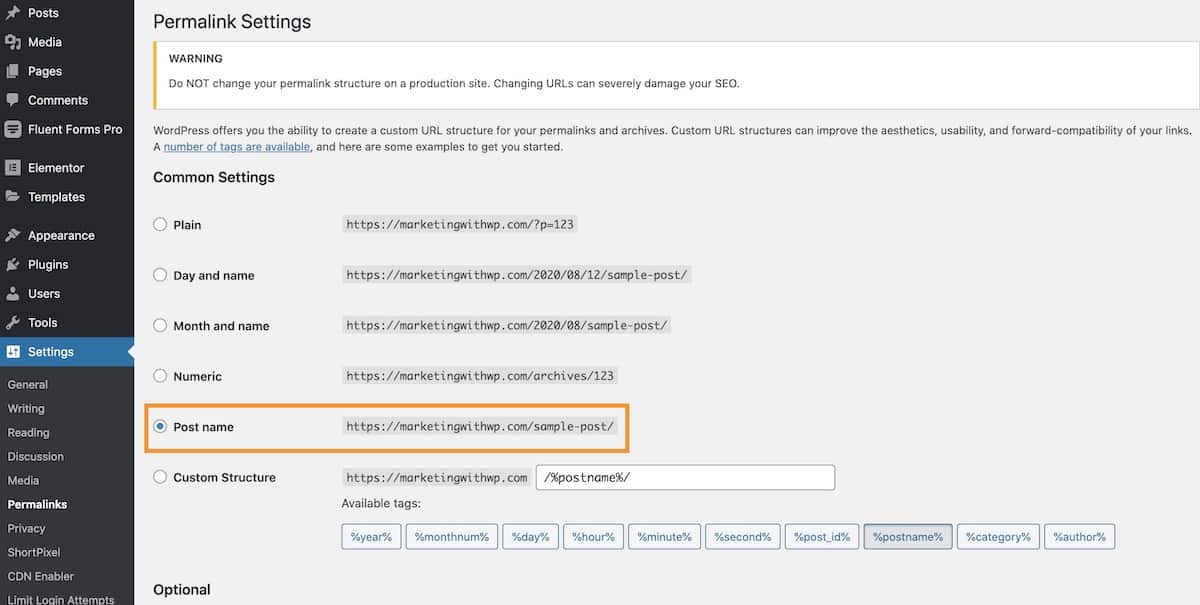
To configure permalinks the right way –
Go to Settings >> Permalinks >> Under common settings, we recommended choosing the 5th option – Post Name.
You can find a complete breakdown on WordPress Permalink Settings and the different options available on our in-depth guide.
17. Setup WordPress SEO Plugin
WordPress is the most installed CMS, mainly because of its SEO-friendly features. However, by default, it does not come with a built-in Search Engine Optimization Plugin.
An SEO plugin creates the right meta codes on your webpage. These meta codes are used by search engines to understand the content on the pages of the website. Moreover, SEO plugins provide SEO Signals to search engines such as what the website is about and its entities.
There are various free as well as premium WordPress SEO Plugins to choose from. You can initially start with a free WordPress Search Engine Optimization Plugin and then upgrade to premium.
Plugins like SEOPress, Yoast, All-In-One SEO, and Rank Math are some of the most downloaded WordPress SEO Plugins.
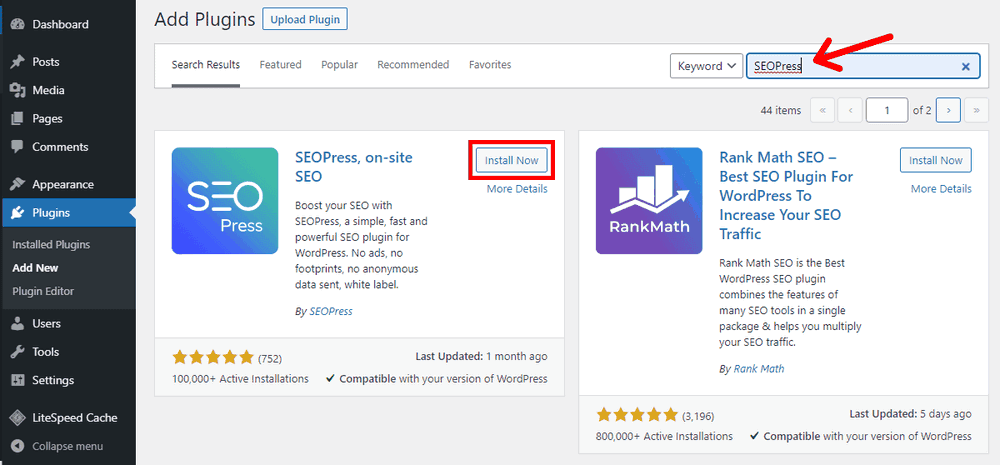
How to install and activate SEOPress –
Go to Plugins >> Add New Plugin >> Search for SEOPress >> Install SEOPress >> Activate SEOPress
Still, confused? Learn how to install a WordPress plugin, and set up and configure WordPress SEO Plugin.
18. Configure Google Search Console
It is highly recommended to configure and set up Google Search Console (Previously Google Webmasters Tool) after setting up your WordPress website.
Search Engine Optimization experts believe that setting up Google Search Console is essential to having your website getting indexed by Google. Moreover, Google Search Console provides the option to manually upload your website’s sitemap and begin indexing contents.

To set up Google Search Console using SEOPress –
After installing and activation SEOPress >> Go to SEOPress >> Dashboard >> Add Your Site to Google >> Add Property *Setting up Google Search Console requires access to your DNS – to verify that you own the domain name
Do not have SEOPress? No problem, we have a step-by-step guide on setting up Google Search Console.
19. Utilize Image Optimizer
Website loading speed and user experience are some of the ranking factors for the Google search engine. Quick loading websites with better user experience generally tend to rank higher.
Images are essential in visually explaining the contents on your website and for a good user experience. However, images also slow down your website and increase page load time.
Your webpage’s loading time increases with the size of the images that need to be loaded from the server.
Image Optimization plugin helps serve the right dimension of images, minimize your website’s loading time and deliver the best user experience.
Some of the most common image optimization plugins are ShortPixel, EWWW Image Optimizer, WP Smush, and TinyPNG.
To install image optimization plugin
Go to Plugins >> Add New Plugin >> Search for ShortPixel >> Install ShortPixel >> Activate ShortPixel
*You have to create a free account to get access to 100 image optimizations per month.
20. Install Caching
Caching plugins are popular for efficiently delivering your website’s frequently visited content to your users. This is achieved by creating a static version of your frequently visited contents, instead of dynamically loading the content from your server with each new request. The end result of this is a quick loading website and a better user experience.
Moreover, as previously mentioned, Search Engines prefer websites that load faster and provide a better user experience. This in return increases the possibility of your website’s content ranking well in the search results.
Some hosting providers come with a built-in caching plugin such as LiteSpeed server-level caching. If your hosting account comes with LiteSpeed caching – you are already in good hands.
On the other hand, some of the most popular stand-alone caching plugins are W3 Total Cache, WP Super Cache, WP Rocket, and Flying Press.
To Install a caching plugin –
Go To Plugins >> Add New Plugin >> Search for W3 Total Cache >> Install Total Cache >> Activate Total Cache
Implement Tracking, Analytics and Conversion –
After setting up site identity, branding, and search engine optimization on your WordPress website, you will start getting visitors to your site. Moreover, you might also be driving traffic to your websites through various other platforms.
However, as important as it is to get traffic to your site, it is equally important to track and analyze how your users are interacting with your website.
We recommend the following things to set up in your WordPress website to understand your website visitors and turn them into customers –
21. Add a Contact Form
For some – a Contact form is a quick and convenient way to get leads from their website. For others, it is a way to prevent displaying email addresses publicly.

Whatever your reasons – it is essential to make it easy for your potential customers to contact you. A contact form just does that – a simple form on your website that enables your users to get in touch with you.
Some of the most popular contact forms plugins are CF7 (Contact Form 7), WP Fluent Forms, WPForms, Gravity Forms, and Formidable Forms.
We recommend using Fluent Form because it is lightweight and provides a user-friendly interface to customize the contact form.
To install WP Fluent Form –
Go to Plugins >> Add New Plugin >> Search for Fluent Form >> Install Fluent Form >> Activate Fluent Form
*Once you create your first contact form, please make sure to put the contact form shortcode on the relevant pages
Here is a detailed step-by-step guide to add a contact form to a WordPress website.
22. Install Google Analytics
What medium is driving traffic to your website? Where are your visitors geographically located? What is their demographic breakdown? Which content do your users land on? What actions are they taking on your website? These are essential things to know as a business owner and a marketer.
Lucky for you, it is quick and easy to set up Google Analytics in your WordPress website and get the necessary user insights with Google Site kit plugin.
Google has recently released Google Analytics 4 which tracks users’ behavior instead of user sessions. We created a step-by-step guide to set up Google Analytics 4 in your WordPress Website.
Once you have created your Google Analytics account, you can enter the Google Analytics code using SEOPress or through Insert Header Footer Plugin.

To install Google Analytics Code using SEOPress –
Go to SEOPress >> Analytics >> Enable Google Analytics Tracking >> Enter Tracking ID (GA-XXXXXXXXX-X) >> Save Changes
Moreover, the Google Search Console account can be linked to Google Analytics to get organic search performance in the Analytics platform directly.
23. Setup Call-To-Action and Lead Magnet
It is the responsibility of marketers and business owners to make our website visitors’ life easier. Call-To-Action guides your website visitors to take a specific action.
A Call-To-Action can be anything along the lines of learning more, subscribe, contact us, call us, email us, etc. The objective is for them to take the next action you want them to take.
A visitor who might not be familiar with your brand or business might be hesitant to provide you their email address. In such cases – a piece of valuable information can be provided in exchange for their email address. The valuable content or asset you provide in exchange for an email address is called a Lead Magnet.
Depending on your theme or your page builder, there is a wide range of options to create a custom Call-To-Action button and lead magnets.
If you set up your WordPress website with the recommendations we provided, your website’s foundation will be strong and you are off to a great start.
Next up – check out our complete guide to optimize the content on a website with a complete On-Page SEO guide.


