The tools and plugins recommend in the site are the ones we use, have tried or tested ourselves and recommend to our readers. Marketing With WP is supported by readers like yourself. If you take an action (such as a purchase) we might earn an affiliate revenue at no extra cost to you.
SEOPress Tutorial – Install and setup WordPress SEO Plugin
An SEO plugin is one of the most important plugins on a WordPress website. The SEO plugin is sort-of like a technical translator between the website and search engines, communicating what your content is about and what keyword it should rank for.
In this post, we walkthrough how to install and setup SEOPress – one of the most popular SEO plugin.
To start off – there are a variety of free and premium WordPress SEO plugins options available online. We use SEOPress ourselves and trust the plugin with all our websites. It is lightweight, feature-rich, and very easy to use. There is a free as well as a pro version of SEOPress.
This beginners guide covers the free version of the plugin – which provides all the essential options to get started with Search Engine Optimization on a WordPress Website.
 -80%
-80%
SEOPress Pro Course
$9
$49
Get started today for free
What you’ll learn –
– Become SEOPress Pro Power User
– Make your content stand out with Schema and Structured Data
– Control your website’s content visibility in Search Engines
– Understand how various settings affect your Website’s SEO and Performance
– Become SEOPress Pro Power User
– Make your content stand out with Schema and Structured Data
– Control your website’s content visibility in Search Engines
– Understand how various settings affect your Website’s SEO and Performance
WordPress SEO Overview
SEO is the process of improving a website’s performance and ranking in Search Engine Result Pages (SERPs) for a given search query.
It is estimated that 63,000 search queries taking place in Google every second. Moreover, WordPress CMS powers around 40% of all the websites online – around 64 million websites.
Search Engine Optimization helps a WordPress Website to increase visibility in the SERPS and drive traffic to the website for relevant search queries. As a result, you’ll gain organic traffic to the website, increased brand awareness and most importantly – more business.
SEOPress is one of the best SEO plugins for a WordPress website. It is a free plugin that optimizes various aspects of a website such as pages and post’s titles, meta descriptions, URLs, readability, etc. It can add Open Graph metadata, Schema data, and social media images to the contents of a website.
The features provided by SEOPress allows the search engines to understand the website’s content and display the website’s pages for relevant search queries.
Moreover, users love SEOPress. It has over 190,000 active installations, with a near-perfect rating of 4.9 out of 5.
The best part is that the plugin has a free version and has a lot of features compared to other popular SEO plugins like Yoast, Rankmath, All in One SEO, etc.
SEOPress ‘Free’ Features

The free version of the SEOPress provides the following features –
- Easy Installation wizard
- XML and HTML Sitemap
- Google Knowledge Graph
- Facebook Open Graph
- Twitter Card
- Content Analysis (SEO and Readability)
- Google Analytics (GDPR ready)
- Matomo Cloud (GDPR ready)
- Google Tag Manager (GDPR ready)
- Plugin settings Import/Export
- Import SEO settings from other SEO plugins
- Redirect attachments to post parent or file URL
- Doesn’t display ads
- No footprints
- No anonymous data collection
- White label
- Intuitive Interface
Install and activate SEOPress
SEOPress can be easily installed from the WordPress dashboard since it is available in the WordPress repository.
Log in to your WordPress website admin dashboard. Then, go to
Plugins > Add New
On the search bar, type ‘SEOPress’ so that the plugin appears on the search. Then, click on the ‘Install Now’ button next to it.
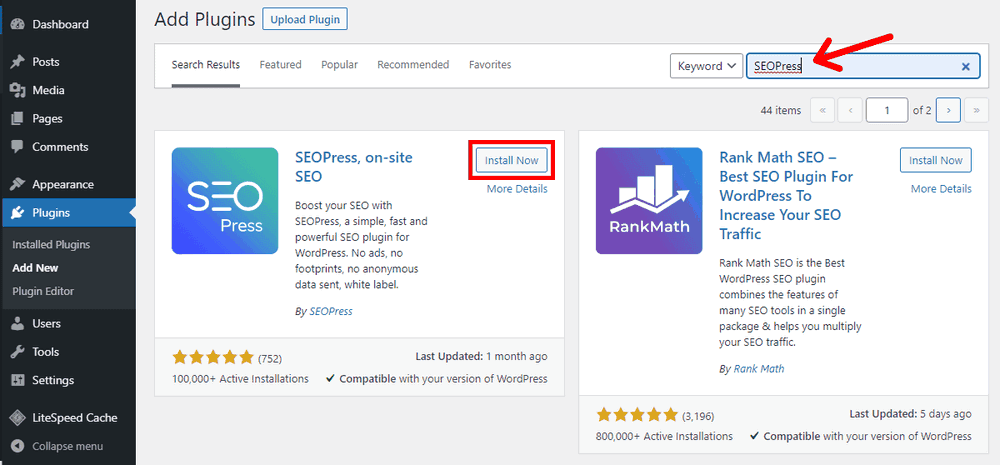
After the installation completes, click on the Activate button to activate SEOPress on your website.
You can also look for our step-by-step guide for installing a WordPress plugin to learn in detail.
After activating, a separate menu with different sub-menus for SEOPress appears on the left sidebar. You can start playing around from there. All the settings and configurations are pretty simple and streamlined, so there should be no problem at all.
SEOPress Installation Wizard
SEOPress provides a quick and easy installation wizard for managing your website’s basic SEO settings and preferences.
We recommended running the installation wizard the first time SEOPress is installed and activated.
In the WordPress dashboard, go to SEOPress > Dashboard. There, you’ll see a welcome screen with the button to get started on the installation wizard.

Click the Get Started button, a step-by-step configuration will follow.
If you installed and used another SEO Plugin, the first step is to import SEO settings from other SEO plugins.

*If SEOPress is the first SEO Plugin installed and activated on your site, you can skip the import settings options.
Next, you can choose a separator, enter the homepage title, company’s name, logo, social profiles, etc. Give as much information as you can, then you can continue to the next step.
Please make sure to enter consistent Name, Address and Phone Number throughout all the online and digital assets.

Then, you’ll see the Indexing settings. Here, you can tell search engines to enable or disable indexing of any posts, pages, categories, or tags.
The options should be selected or disabled depending on the type of website and the content you want to be displayed on the search engines. So, check the boxes and click on Continue.

Next, under Advanced Options, you’ll have additional adjustments like show/hide author archive, remove a category in permalinks, show/hide SEO columns in posts list, and so on. Choose them according to your preferences.

That’s pretty much all. You can skip the Insights step, and then click on Visit Dashboard on the next page.

Manage Titles and Metas
The next important thing to do is manage your titles and meta descriptions. They are used by search engines to display your web pages in search results.
You can find the settings in SEO > Titles and Metas.
Home Page Meta Data
The first thing you can do is enter the title and meta description for your home page. On the Home tab, you’ll see fields for entering separator, title, and meta description. Enter them accordingly using hard texts or the tags available there. After done, don’t forget to save changes.

Post Types Meta data
Here, you can customize the title and meta description formats for your blog posts and pages.
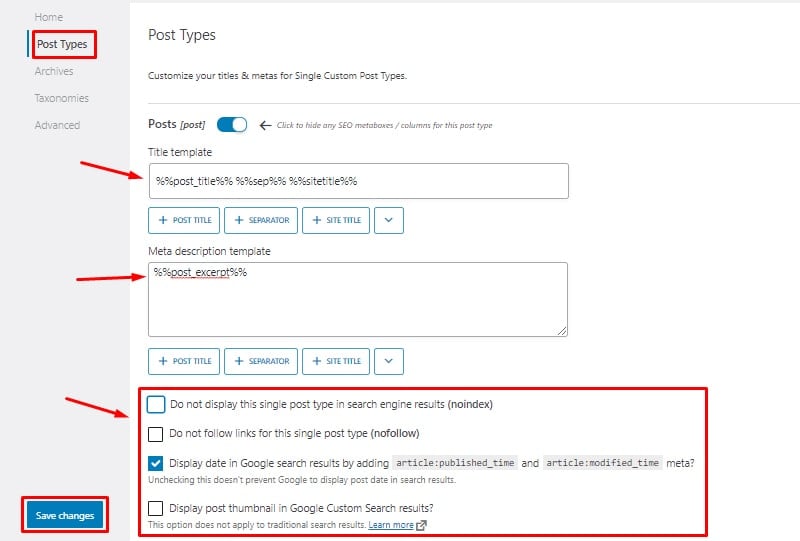
On the Post Types tab, you’ll see the title and description fields for posts. It has default standard values set in the beginning. You can edit them with the provided tags or leave the defaults.
Note – If you like having more customized SEO titles and Meta descriptions, the options will be available on the SEOPress settings on your post/page editor as well.
Below the fields, you’ll see checkboxes for different functions. Make sure you don’t check the first 2, as they’re for disabling indexing and dofollow of your posts.
The latter 2 checkboxes are for displaying the published date and post thumbnail of the pages or posts on the search results. You can enable or disable them for your benefit. For example, if you’re constantly updating your posts, then displaying dates in search results is a good idea. Else, it’s better to hide if your content is dated.
The same options are available for Pages which you’ll see on scrolling the page below.
After done, you can click on Save Changes to save the settings.
Archive Pages Meta data
Similarly, you can manage SEO titles and meta descriptions for different archive pages. That’s available on the Archives tab just below the Post Types Tag.
There, you can set meta data for author archives, date archives, search archives, and 404 archives. Similar to previous options, you can use the available tags.
Then, you can use the checkboxes if you want to enable/disable the archive pages to index or display in the search engines.

Taxonomies Meta data
Here, you get to manage meta information for your post taxonomies i.e. categories and tags.
In the Taxonomies tag, you’ll see the text area for entering the meta data along with the checkboxes. The settings are similar to the previous ones.

Advanced
On the advanced settings, you’ll have some checkbox options like noindex, nofollow, noimageindex, noarchive, nosnippet, and so on. You don’t need to change anything here for starting out, as everything is at default.
Create SiteMaps
A sitemap is a file containing the list of all the web pages and content on your website. In SEOPress, you get to create 2 types of sitemaps – XML and HTML sitemaps.
The XML sitemap is the one that we need for improving SEO. It helps Google and other search engine discover your web pages faster. As a result, it’s crawled, indexed, and ranked faster.
While an HTML sitemap is there to let users know about the content and structure of your site. You don’t need it for your website SEO. Anyway, it’s a free feature offered by SEOPress you can use to let users navigate through your website.
Now, if you go to SEO > XML – HTML Sitemap on your dashboard, you can view and generate your sitemap. You can also choose what to include and what not on your sitemap.
So, on the General menu, you get to choose what to include on your sitemap. Typically, you’d want to enable XML sitemap and XML image sitemaps. If you have multiple authors on your site, then you can enable Author sitemap too. You can disable the HTML sitemap for now.
You can click on the Save changes button after that.
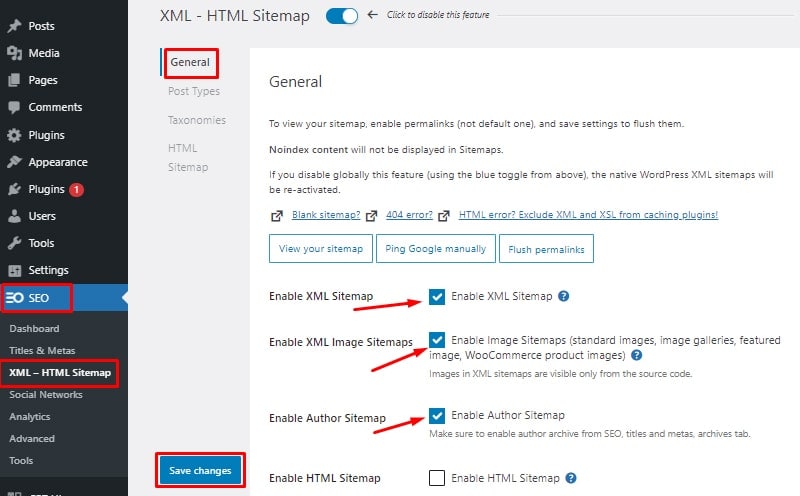
To see the sitemap, you can click on the View your sitemap button on the same page.

Then, it will redirect you to your sitemap index page. It looks something like this.

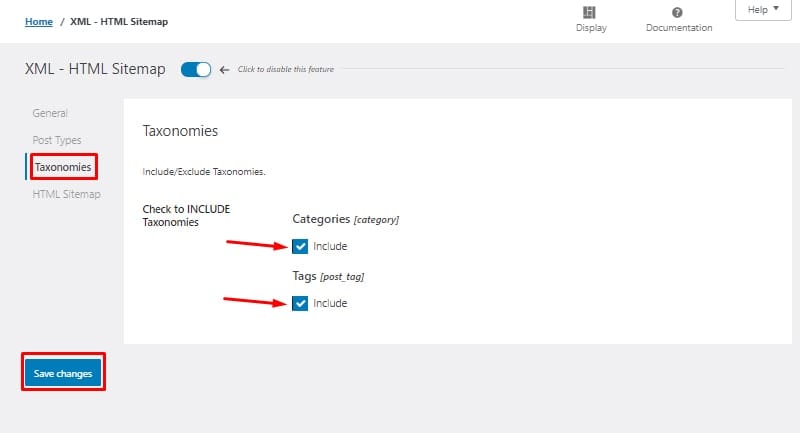
Now, you can have further control over your sitemap. You can go to the Post Types tab there and make sure the Posts and Pages options are checked.

Similarly, under the Taxonomies section, check the boxes to include Categories and Tags sitemaps. Don’t forget to click on Save changes.
Did you know, submitting sitemaps to Google Search Console helps Google find your web pages quickly? So, here’s a helpful guide on how to set up Google Search Console and submit your sitemap to it.
Manage Social Networks
Next, SEOPress also lets you manage your social networks. Basically, here you can configure your business details on Google, link all your social profiles, manage Facebook Open Graph, and the Twitter card. These settings are important for building authority and verification on social media.
Knowledge Graph
To begin with, go to Social Networks under the SEOPress menu in your dashboard. The first tab you’ll see is Knowledge Graph. Here you enter your organization and business details to let Google know about it. Here, just choose if your website is personal or for an organization, type in its name and upload a logo.
You can also enter your phone numbers, contact options, and types. But they are only optional.
After you entered the details, click on the Save Changes button.

Social Accounts
On the Your Social Accounts tab, you get to enter all your social media accounts. You can enter URLs of major social platforms like Facebook, Twitter, Pinterest, Instagram, YouTube, and LinkedIn.
Enter links of all the ones you have and leave the fields empty for which you don’t have. After that, click on Save Changes.

Configure Facebook (Open Graph)
Here, you’ll find the settings to enable and manage Facebook open graph data. With that, your website links look attractive on Facebook when shared.
It lets you pick Facebook thumbnail, page ID, admin ID, etc. for creating the open graph data. However, you can just add a thumbnail image and page ID for now.
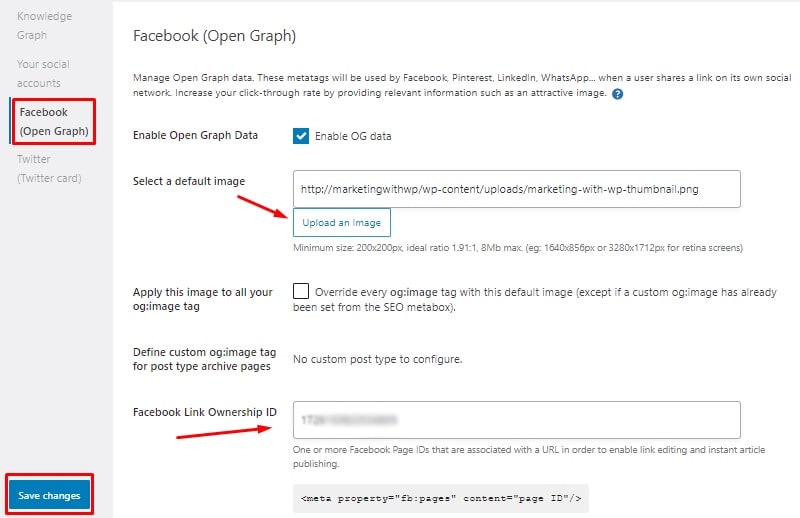
Here’s how to find Facebook Page ID.
Configure Twitter Card
Similarly, you can manage how your website looks on Twitter.
So, go to the Twitter (Twitter Card) tab. First, make sure that the Twitter card is enabled. If not, then click on the checkbox. Next, click on the checkbox to ‘Use Open Graph in no Twitter card is filled’.
Now, choose the default Twitter thumbnail image, and also the image size – default or large. We recommend choosing the ‘large’ image size which increases the chance of getting more clicks.

Set Up Analytics
Another important feature of SEOPress is linking your website with tracking tools like Google Analytics and Matomo. You can easily insert your tracking ID of these tools here so you don’t need to touch your source code.
General
First, let’s see how you can insert Google Analytics tracking code with SEOPress.
Go to Analytics under the SEOPress menu. On the General tab, you’ll need to click to tick the checkbox in order to enable Google Analytics Tracking. Below that, you’ll need to enter your Google Analytics tracking ID or GA4 measurement ID.
To get your tracking code, you’ll need to set up Google Analytics for your WordPress website.
Next, you can choose who has the access to the tracking. Ideally, you’d want to exclude every user role except the Administrator.
Tracking
In the Tracking section, you can connect to various other services with their tracking ID or codes. The most notable connections available are for Google Optimize and Google Ads, which other SEO plugins most probably don’t offer.
So, enter your tracking IDs if you have set up an account on those programs.
Moreover, you can add additional tracking codes if you want. You can add them in the header, body, or footer section.
On scrolling down below, you’ll find checkboxes for enabling re-marketing, demographics, & interest repost. IP anonymization, cross-domain tracking, etc.
Events
You can also track events like downloads and clicks on Google Analytics with SEOPress. For that, you go to the Events section on the Analytics menu.
For that, just check the box next to the ‘Enable downloads tracking’ option. Below that, enter the formats of the downloadable files, separated by the pipe ‘|’ symbol.
You can also enable tracking affiliate or outbound links i.e. the links pointing to other websites.
Custom Dimensions
SEOPress lets you configure your custom dimension in Google Analytics. What this means is that you can create a way to track some unique data that Google Analytics doesn’t automatically track.
Basically, you can create custom dimensions that track authors, categories, tags, post types, and logged-in users. Just pick a custom dimension name from the drop-down next to each element you want to track.

Cookie bar / GDPR
This section is useful for 2 things –
- Handle visitors’ consent on your website
- Create and customize cookie bar
Having that said, let’s go to Cookie bar / GDPR. There, you’ll see a lot of options for you to play around with.
Start by selecting where to display the cookie bar. You can just go with the recommended option i.e. after the opening body tag.
Next, make sure you check the option to request the user’s consent for tracking. It’s important if you abide by the GDPR compliance law.

You’ll see more options on the cookies when you scroll below.
There, you can also type in the consent message that would be displayed to users on the cookie bar. Moreover, you can create a whole cookie bar with accept button, close button, cookie expiration date, cookie bar position, color, and so on.

Matomo
Now, the last option in the Analytics settings is Matomo. It’s a popular user tracking tool, an alternative to Google Analytics.
If you don’t have a Matomo account set up, then you can leave this option. But if you have one, then you can easily connect it to your website with SEOPress.
To enable Matomo tracking, go to Matomo in the Analytics menu. Start by checking the ‘enable Matomo tracking’ checkbox first. After that, enter your tracking ID, and your site ID. You’ll find these values on your Matomo cloud account.
You have tons of other options there like cross-domain linking, enabling/disabling cookies, prepend site domain, etc.
Advanced SEO Settings
In the advanced menu, you get to manage various things like image SEO, advanced URL configuration, Google Search Console verification, webmaster tools verification, appearance, security, and so on.
Image SEO
Here, you’ll find different options for optimizing SEO for your images.
You’ll find the settings in the Advanced sub-menu under the SEO menu. On the Image SEO tab, there are a bunch of options available.
Here, make sure the first checkbox ‘Redirect attachment pages to post parent’ is checked. It’s driving users to your website when they click on your images on search results.
If you want to redirect users to that specific image only, then check the second checkbox i.e. ‘Redirect attachment pages to their file URL’.
Next, you can set it automatic image file titles caption, and alt text, then you can check the options. But, we recommend you to write your image titles and alt tags by yourself.

Advanced
In the Advanced options, you can do additional adjustments to your website appearance and SEO.
Here, you can choose to remove category and product category from your URLs. If you want that, then check the boxes. However, we recommend not doing it.
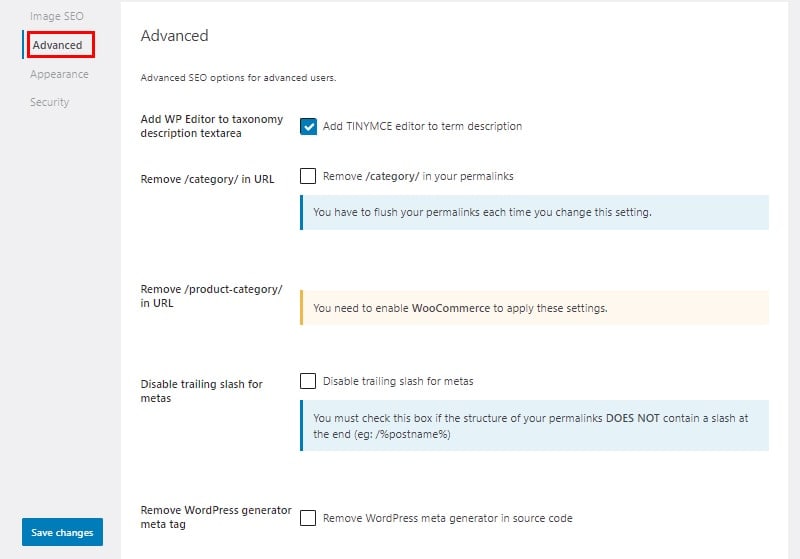
Now, the important setting here is the Google and other search engines’ webmaster tool verification. If you scroll down below on the same page, you’ll see text areas for entering the tracking ID for Google, Bing, Pinterest, and Yandex.

It’s a really good feature to have since it removes the need of having additional plugins and you don’t have to work with the codes.
Appearance
In the Appearance section, you can configure what SEOPress settings you want to display your website backend.
So, go to the Appearance tab and take a look around with the options available there. You can disable the noindex item and SEO menu bar at the top of your admin bar. This makes your admin bar look clean.

Moreover, there are options to show/hide title columns, meta description columns, SEO news, notification center, and so on.
It’s all up to you for what you want to display and what you don’t want. If you’re not sure, then you can leave them at default.
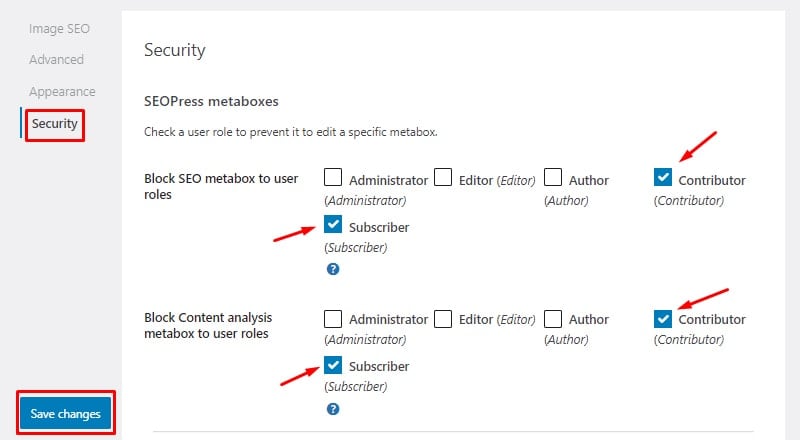
Security
In this tab, you’ll see choose who can access and edit the SEO and content meta box, and SEOPress SEO settings page.
The SEO and content analysis meta boxes are useful mainly for writing blog posts and create pages. So, you’d want to give them access to your website admin, author, and editor. So, you might want to prevent their access to other roles. For that, click the checkboxes next to ‘Contributors’ and ‘Subscribers’.
On the same page, you’ll also see the option to allow different user roles access to your SEOPress settings. We recommend you leave all of them unchecked so that no other user role can access them. It’s because your website’s admin should handle the SEO settings.
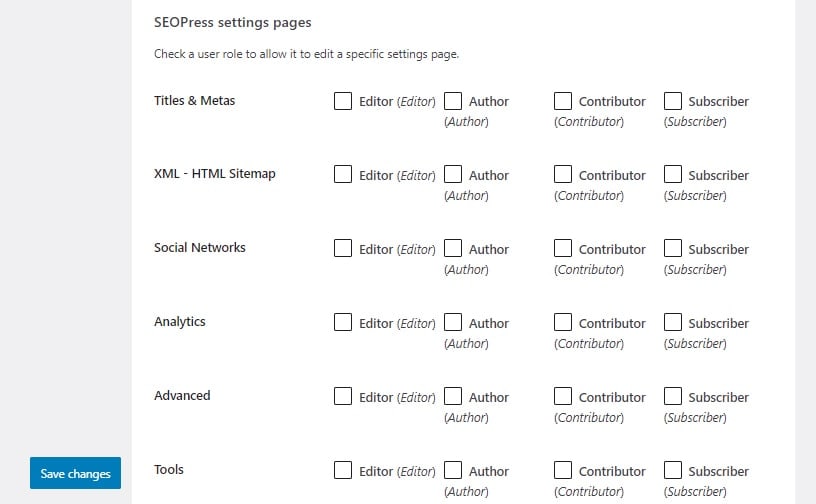
After done, remember to click on Save Changes.
Tools
In the Tools menu, you’ll have settings like integration with page builders, plugin configuration import & export, metadata import from other SEO plugins, and resetting your SEOPress settings.
Some of these settings might require you to work with codes. It’s better if you’re familiar with some technical aspects of WordPress. Anyway, let’s see all of them in brief.
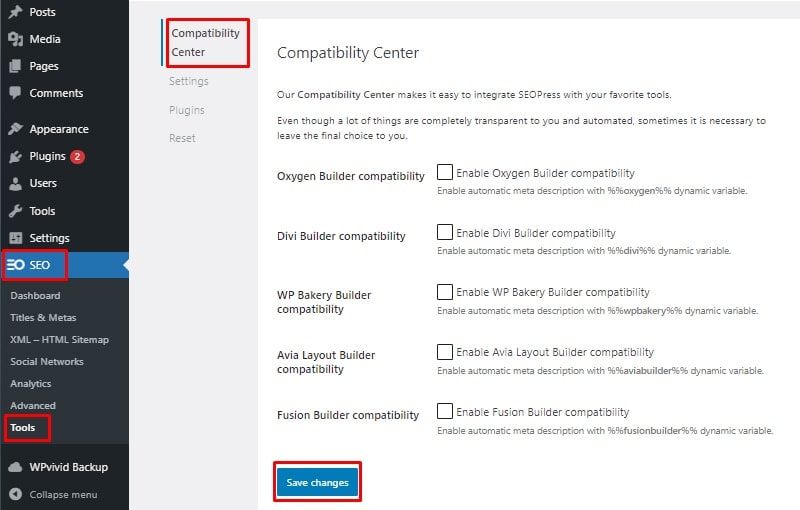
Compatibility Center
The Compatibility Center of SEOPress makes it easier for you to integrate SEOPress with other popular page builder tools to generate automatic titles and meta descriptions.
However, we advise you against it. Since the page builders run on shortcodes, it may affect your site. To make it work, you might have to add codes on your theme file, which we don’t recommend for beginners.
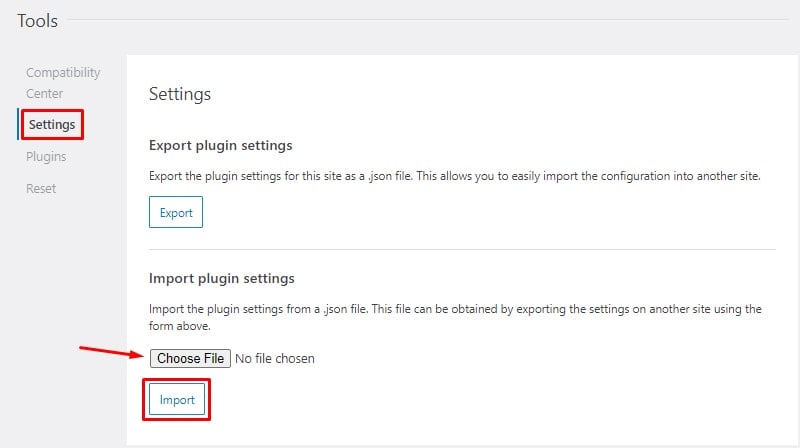
Settings
Next, on the settings options, you can export and import the settings for SEOPress on different domains.
Suppose you’ve configured your SEOPress settings a certain way on one of your websites. And, you want to use the same settings for another website. In that case, you can export the settings from the first site and import them on the latter one.
For that, log in to the website whose settings you want to export. After that, go to
SEO > Tools > Settings
After that, click on the Export button.
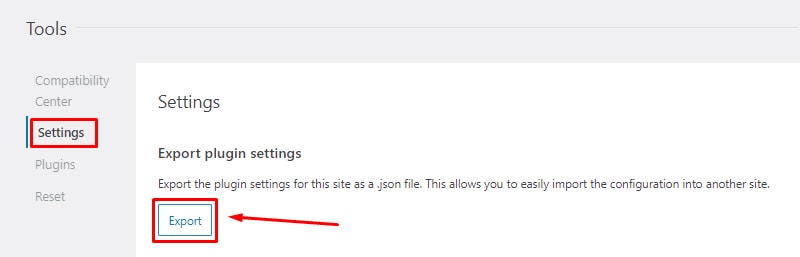
Doing so, it’ll save a file (.json) on your PC.
Now, log in to your next website where you want to import the SEOPress settings. Now again, go to
SEO > Tools > Settings
After that, choose the ‘.json’ file from your PC you’ve downloaded earlier. After that, click on Import.
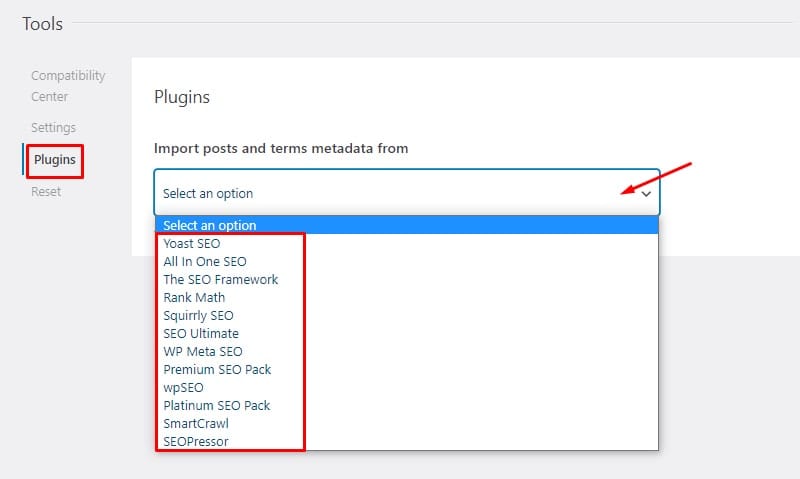
Plugins
Next, we have the Plugins menu where you can import the SEO settings and posts metadata from other SEO plugins. You have lots of plugins available for importing.
If you want to import the data, just go to the Plugins tab. And then, select the plugin to import data from.
Reset
Last on the Tools menu, we have the Reset tab. Here, you can reset all SEOPress settings and clear notices from your Notifications center if you wish.
Be careful – resetting settings will clear all your SEOPress configurations and tweaks. So, proceed to it only if you know what you’re doing. Else, stay away from the Reset settings button.
On the other hand, you might need to reset the notifications occasionally. It’s useful when you accidentally clear a useful notification, and you want to bring it back.
Anyway, just click on the Reset notices or Reset settings button on the Reset menu for performing these actions.

Configuring On-page SEO
The SEO analysis feature is among the most important features of SEOPress. All SEO plugins have included this feature, but SEOPress has something more to offer.
SEOPress provides a powerful SEO analysis meta box for optimizing your pages and posts for SEO and content readability. You’ll find it typically at the bottom of your post/page editor.

Firstly, the SEO meta box lets you enter the custom SEO title and meta description for each post and page individually.
It displays a limit for ideal title and meta description lengths. Most SEO plugins set the limit with characters. But, SEOPress gets 1 step ahead by showing the character length by pixels.
You’ll also get to see the Google snippet preview i.e. see how your web pages appear in Google search result pages, both on mobile and desktop.
From here, you can also tweak your website appearance for Facebook and Twitter with customizable titles, descriptions, and thumbnail images.
Moreover, it also lets you canonical page URL, manages indexing, redirection, etc.
Checkout an in-depth resource we have put together on everything about On-Page SEO.
Content Analysis

Similarly, you have the Content Analysis meta box at the bottom of the page or post editor.
It lets you enter the target keywords for which you want it to rank. Then, it scans your content and provides results and suggestions for improvements based on the keyword.
Notably, SEOPress lets you enter and analyze content for multiple keywords. While most SEO plugins like Yoast let you optimize for only one.
Check out our complete guide on SEO keywords, keyword research and understanding the intent behind keywords.
Now, below you’ll see what’s really optimized and what needs to be improved on your content. It’ll suggest proper word counts, keyword density, keywords in titles, meta descriptions, permalink, headings, etc.
In addition, it’ll also check your internal and external links and which are nofollow ones.
Conclusion
That’s all! Now you know how to install and setup SEOPress for your new WordPress website.
Just to remind you, here we learned how to install and setup SEOPress and took a tour around its important features. This might look like a lot to take in at the beginning, but it’s only a matter of time before you learn it perfectly. Then, you can configure your website with the best SEO settings and practices.
Check out our complete SEOPress Review and find out the Features, Pros, Cons, Pricing, Discount, Coupons & Alternatives to see if it is good choice for you.
New to WordPress? Then we recommend reading our free comprehensive guide on essential things to set up in your WordPress website.
For additional reading, you can check our helpful guide on how to backup your WordPress website. This will help you save your WordPress website data from potential threats.


