The tools and plugins recommend in the site are the ones we use, have tried or tested ourselves and recommend to our readers. Marketing With WP is supported by readers like yourself. If you take an action (such as a purchase) we might earn an affiliate revenue at no extra cost to you.
How To Install a WordPress Plugin?

Wondering how to add, install and activate a new plugin to your WordPress site? This post covers everything on adding a new WordPress plugin to a WordPress website.
Simply put, plugins are extensions that add functions to your WordPress website. Features like speed, security, eCommerce, login forms, backup, etc. are attained with plugins in WordPress.
If you’re just starting with WordPress, then installing plugins might be a new thing to you. You might also have no idea how to do it yourself.
There are actually a few ways to add a WordPress plugin.
Among them, the easiest way is to find and install a plugin directly from your WordPress admin dashboard. This works for all the free plugins on the WordPress.org repository. Besides, you can also install plugins with the plugin file upload method or via FTP (File Transfer Protocol).
Feeling overwhelmed? Don’t worry – because we’re going to show you all the steps you need to install the desired WordPress plugins.
With our guide, you’ll be able to add any type plugin to your WordPress website easily.
Installing Your WordPress Plugin – 3 Different Options
Here’s a fact –
There are over 58,000 free plugins in the WordPress repository that add features and functionality to your WordPress website.
The plugins vary in terms of features, functionality and prices.
Since WordPress CMS has a lot of moving parts, a single installation method might not work all the time.
Thus, here we are going to show you 3 different ways to add a plugin to your WordPress site. These methods should work for any and all plugins you need for your website.
- Automatically from WordPress Dashboard
- Manually by Upload Method
- Via FTP
Now let’s see the steps involved.
Option 1) Add Plugins Automatically from the WordPress Admin Dashboard
The easiest and most popular way to add a plugin is to search and find a plugin from your WordPress admin area.
This method works if you’re looking for installing a free plugin on the WordPress.org repository.
Step 1) Login to your WordPress Dashboard
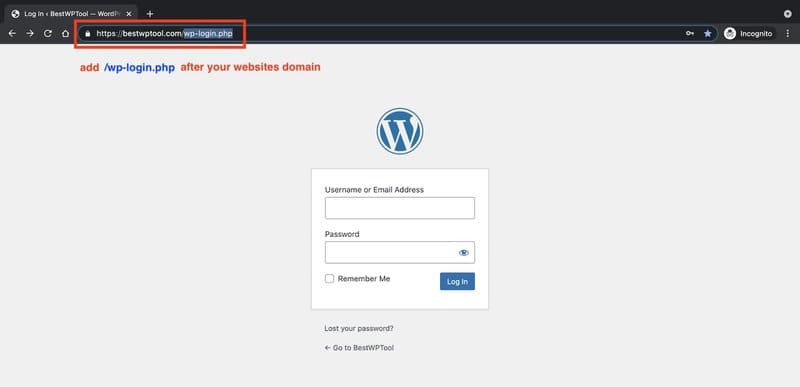
To start with it, you should first login to your WordPress admin area. If you’re not logged in, then go to your WordPress login page with the login page URL.
It looks like:
https//yourwebsite.com/wp-login.php
Remember to replace ‘yourwebsite.com’ with your own website’s URL.

Then, enter your username and password and click on Log In to access your WordPress site dashboard.
After the login completes, you reach the dashboard from where you can start with installing your plugin.
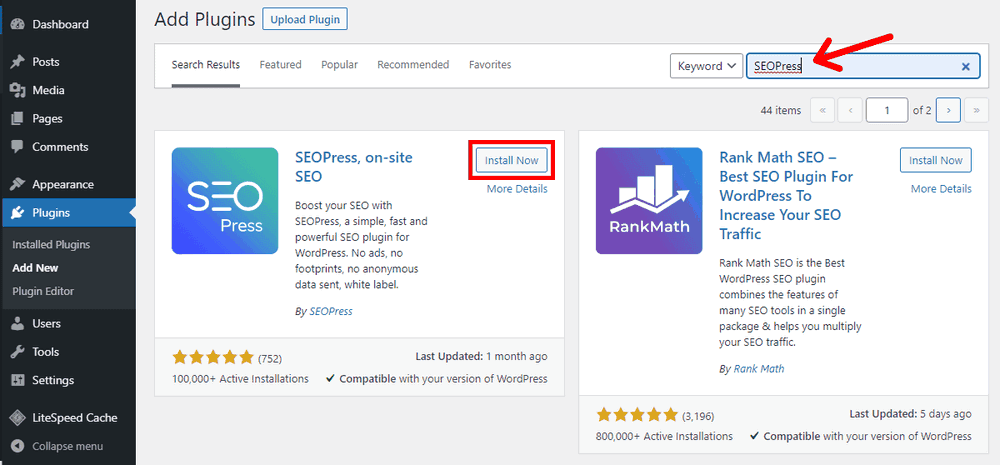
Step 2) Search for the Plugin
Then on the site’s dashboard, go to
Plugins > Add New.

On the next page, the first thing you’ll see is a list of featured plugins. Additionally, you can find more plugins from the Popular, Recommended, and Favorites sections. Moreover, you can use the search bar to find the plugin you’re looking for.
Simply write in your plugin’s name on the search box. Here, we’re installing the popular SEO plugin, SEOPress for demonstration. The same process applies to all other WordPress.org plugins.
Step 3) Install the Plugin
After you find the plugin you’re looking for, click on the Install Now button to start the installation. It might take some time to complete.
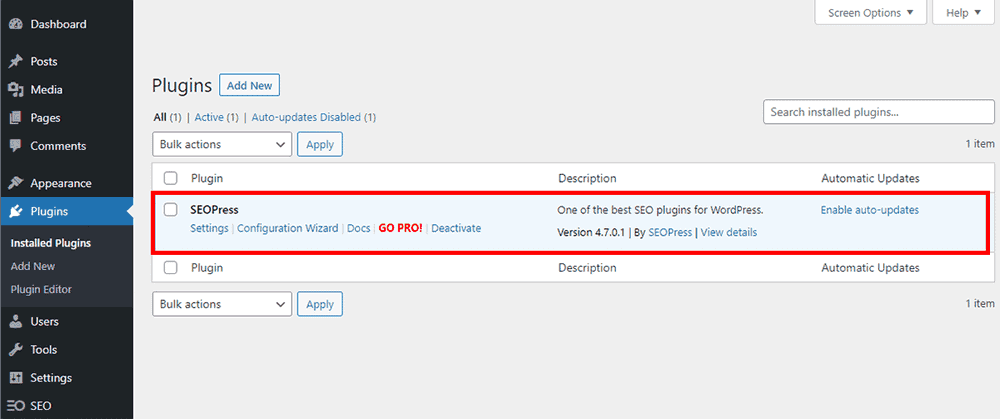
Step 4) Activate the Plugin
Once the plugin is installed, it will show the option to Activate.

Once done, it’ll display the activation complete message and you’re good to configure and use the plugin.
To find the plugins currently installed in your WordPress CMS, you can go to –
Plugins > Installed Plugins
The above method of adding the plugin directly from the WordPress repository is the most common way to add a plugin.
If everything is good, once installed, check out how to setup and configure SEOPress WordPress SEO Plugin.
If the plugin is not in the repository, and some plugins are premium which can be only downloaded from their respective websites. In such cases – the following other options are available –
Option 2) Upload Plugins Manually
This method requires you to upload a plugin to your WordPress site from your local device.
It’s popular mainly for installing premium plugins from sources like CodeCanyon. In addition, it’s also the right option to install a self-made and personalized plugin.
Anyway, this approach is useful if you have the plugin’s backup on your local device.
Step 1) Login to your WordPress Dashboard
To start with it, you should first login to your WordPress admin area. If you’re not logged in, then go to your WordPress login page with the login page URL.
It looks like:
https//yourwebsite.com/wp-login.php
Remember to replace ‘yourwebsite.com’ with your own website’s URL.
Then, enter your username and password and click on Log In to access your WordPress site dashboard.
After the login completes, you reach the dashboard from where you can start with installing your plugin.
Step 2) Upload Plugin File Manually
Then on the site’s dashboard, go to
Plugins > Add New.
On the next page, you’ll see the Upload Plugin button at the top. Simply click on it.
Next, you’ll see a form to upload the plugin with the Choose File button. Click on it to pick the plugin from your local directory.

Then, browse and find the plugin from your local folder.
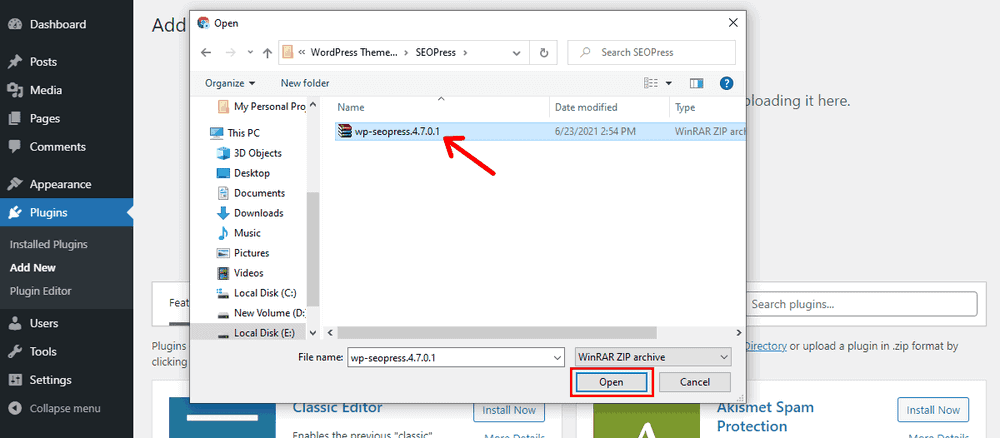
Note: Make sure that the plugin is in ‘.zip’ format. If it’s not, then zip it first.
Step 3) Install the Plugin
After you select the plugin from your local drive, click on the Install Now button to start the installation. It might take some time to complete.

Be patient! The installation will take some time because the file needs to be uploaded to your hosting site first.
Step 4) Activate the Plugin
Once the plugin is installed, it will show the option to Activate.
Click on the Activate Plugin button to activate it.
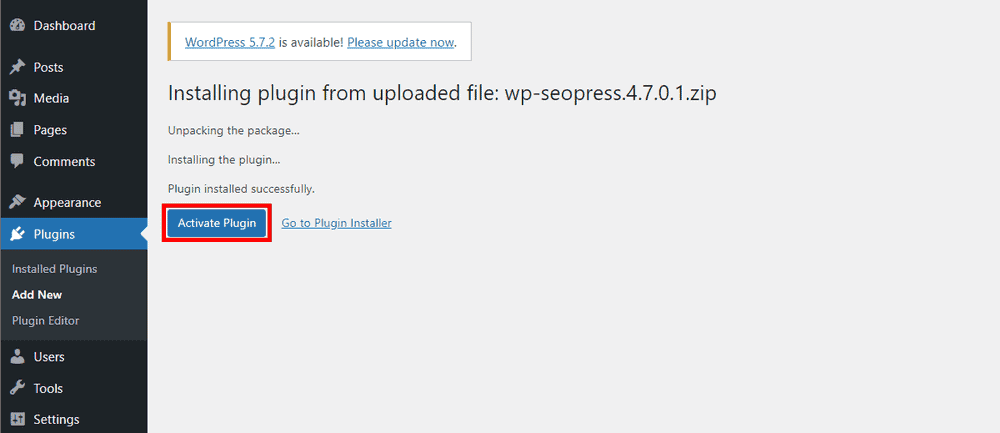
It’ll notify you with an activation message after completion.
Once installed, check out how to setup and configure SEOPress WordPress SEO Plugin.
Option 3) Add WordPress Plugin using FTP
The above methods work for adding most of the WordPress plugins.
However, sometimes a site might have errors that prevent you from installing the plugins. Also, your host and site configuration might prevent uploading and installing large size plugins.
In those cases, you need to install the plugins using FTP (File Transfer Protocol).
However, you should know that installing using FTP is a little bit technical. So, we recommend going ahead with this method only if the above 2 methods don’t work.
Anyway, let’s see the steps of installing a WordPress Plugin with FTP.
Step 1) Install FTP Client on your PC
For this method, you need to have an FTP client on your computer. It’s a tool that connects your WordPress hosting account with your local drives.
Some of the available ones are FileZilla, Free FTP, CyberDuck, etc. All of them function in a similar way, so, install any of them you prefer. We’re using FileZilla for now.
To install it, go FileZilla website, download it to your system, and run the setup.
Step 2) Connect your WordPress Hosting with Local PC using FTP
The next step is to connect your WordPress hosting with your local computer with FileZilla.
For that, open FileZilla on your PC. On the left side, you’ll see your PC’s folders under Local Site.
Now, to establish the connection, it requires you to enter the connection credentials i.e. Host, Username, Password, and Port.

Simply, enter your website URL in the host field with the prefix ‘ftp://’.
Example: ftp://yourwebsite.com
Or, you can also enter your FTP IP.
The FTP login credentials will be inside your hosting account. Your hosting support can also help you with getting the credentials.
Similarly, you’ll need to create an FTP account to get access to the username and password. For that, go to your hosting cPanel or dashboard, and find the FTP option in the menu. If you get confused, then you can contact your hosting service for help.
You can just leave the port field blank. If it doesn’t work, then enter the number ’21’.
After collecting your credentials, enter them on FileZilla and click on QuickConnect.

After the connection is made, you’ll see your WordPress site files on the right-hand side under Remote Site.
Step 3) Upload the Plugin
The next step is to transfer the WordPress plugin from left to right, i.e. from your PC to the WordPress directory.
Before that, make sure that the plugin on your local PC is unzipped. If it’s not, then unzip it first before proceeding.
Then, from the Local site, browse to the folder containing your plugin.
Similarly, on the Remote site open
wp-content > plugins
That’s the folder where you should transfer the plugin to.
So, right-click on your plugin folder and click on Upload.

It’ll start uploading the plugin to the WordPress directory inside the plugins folder. After completion, you’ll see a success message.
Step 4) Activate the Plugin
After the upload is complete, you can go back to your WordPress dashboard. Under Plugins > Installed Plugins, you’ll see your plugin.
However, it’s not activated yet. So, activate it by clicking the Activate button.
Now you are all done and can start using the plugin.
Once installed, check out how to setup and configure SEOPress WordPress SEO Plugin.
Most important Plugins to Install on Your WordPress Website
Now that you can add any plugin on your WordPress site, you should also know which are the good ones to start with.
We have compiled a list of some of the best free and premium plugins with their reviews, pros and cons.
Here is a brief list of essential free plugins.
1. SEOPress
SEOPress is a popular SEO plugin that helps you with optimizing your site for search engines. Being a lightweight plugin, it loads fast and takes less space. With features like HTML/XML sitemaps, structured data, Google tools integration, social enhancements, etc. SEOPress is guaranteed to win you traffic.
It’s also available free of cost. Moreover, opting for pro one adds more functions like broken link checker, backlink tool, 404 monitoring, WooCommerce integration, and so on.
Check out the comprehensive walkthrough on How to Install and Setup WordPress SEO Plugin – SEOPress to get started.
2. Google SiteKit
Google’s Site Kit is the official WordPress plugin from Google. It integrates with Google Analytics, Google Search Console, AdSense,PageSpeed Insights, Tag Manager and Google Optimize. Most importantly, it brings Easy-to-understand stats directly on your WordPress dashboard
Site Kit is the one-stop solution to deploy, manage, and get insights from critical Google tools to make the site successful on the web. It provides authoritative, up-to-date insights from multiple Google products directly on the WordPress dashboard for easy access, all for free.
Learn how to add google analytics with Google Sitekit.
2. iThemes Security
iThemes is among the most popular plugin for enforcing WordPress security. Over a million users trust iThemes Security for its robust 30+ ways to secure their website.
The iThemes Security plugin is built to prevent and cope with all the threats associated with WordPress websites. Also, it can emergency shutdown websites, stop automated attacks, and monitors suspicious activities on your website.
Plus, the easy setup and the user-friendly interface make it easier to operate for beginners and small business websites. If you ever get stuck, there’s a detailed documentation and support team behind to help you.
4. WP Fluent Forms
WP Fluent Forms is a WordPress form builder plugin by WP Manage Ninja. It offers the drag-and-drop editor to create beautiful forms with ease.
You can add unique fields to create forms for all purposes. Whether you need a newsletter, contact, signup, or even a survey form, Fluent Forms can create them all. So, WP Fluent Forms is a must-have plugin on your site.
Here’s a detailed guide on how to create a contact form with WP Fluent Forms.
5. Swift Performance
Swift Performance is a plugin that focuses on enhancing your website speed. Basically used for caching your WordPress site, it’s can also carry out image optimization, minifying codes, lazy loading, database cleaning, etc.
Anyway, Swift Performance is a totally speeding WordPress plugin. It comes both as a free and premium tool. So, you can choose any version you want.
6. ShortPixel
ShortPixel is a popular image optimization plugin. It compresses your images and reduces sizes so that they load faster. As a result, your site loads faster and improves your website SEO.
In addition, it can compress almost any format of images including JPG, JPEG, PNG, GIF, etc. Moreover, it converts the images to more optimized formats like WebP and AVIF. Overall, ShortPixel is a good plugin for your WordPress site.
7. Ninja Tables
Ninja Tables is a powerful table builder plugin for WordPress. With this plugin, you can create attractive tables on a WordPress page or post without any coding. The tables created with Ninja Tables are fast and totally responsive.
Additionally, it offers 100+ table styles to choose from so you don’t have to start from scratch. If you want tables on your website for information, pricing, comparison, product lists, etc., then Ninja Tables is the right choice.
Moreover, advanced features like adding media to table, Google Sheets connection, import CSV, WooCommerce integration, advanced sorting, etc. are available in premium Ninja Tables.
Here’s a detailed guide on how to display google sheets data on WordPress site automatically.
8. WPvivid
To make a WordPress website more secure, you should have a backup plugin installed.
WPvivid is an all-in-one WordPress for backup, restore, and migration of websites. It offers automatic and manual backup of full WordPress websites in server storage, cloud, or local computer. Also, restoring the saved backup is possible with a single click. Moreover, you can transfer your website from one domain to another seamlessly.
The best part –all these features are free in the WPvivid plugin and most useful for starting business sites. Plus, the premium version secures your website files with functions like data encryption, incremental backup, site staging, etc.
You can once go through the article – how to back up and restore a WordPress website with WPvivid.
Conclusion
That’s all! We hope that you understood how to add a plugin to your WordPress site.
We highly recommend you to make sure you have followed the essential things to set up in your WordPress site if you’re just starting with WordPress.


