The tools and plugins recommend in the site are the ones we use, have tried or tested ourselves and recommend to our readers. Marketing With WP is supported by readers like yourself. If you take an action (such as a purchase) we might earn an affiliate revenue at no extra cost to you.
How to customize a WordPress Theme? Blocksy Free Theme Customization

WordPress CMS comes with a generic and simple built-in theme. It is not customized for your brand’s look or feel and requires some level of custom work.
To create a website that has a personalized and unique feel to it, website owners should be able to do some customization. The majority of the customization in terms of the site’s look and feel is done inside the theme settings.
Different themes offer varied depth on customization capabilities depending on the type and use-case of the theme. But, the common configurable options like colors, typography, layouts, buttons, etc. for all themes are pretty much the same.
For now, since we have installed the Blocksy theme, let’s see the customization options available on it.
Also, let’s import a demo website first so that it looks like a real site and we can see the changes of the customization clearly. You can check out our post on Blocksy theme customization for demonstration.
So, to start editing the theme, first go to Appearance > Customization from the admin menu.

It will take you to the theme customization a.k.a the WordPress Customizer interface which looks like this.
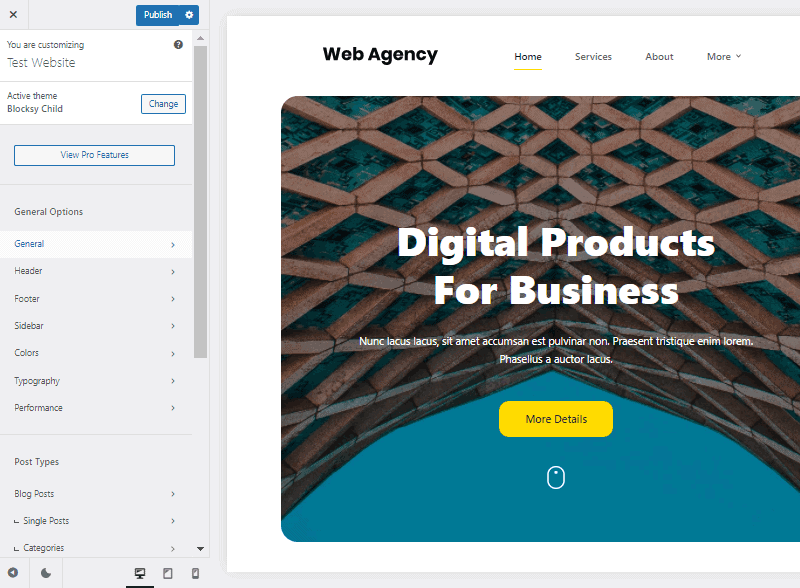
On the left side, you can see a menu with different options like General, Header, Footer, Post layout, etc. There are more if you scroll down below.
The center is the website’s live appearance where you can see the changes made in real-time.
So, let’s see the important things you can do here.
Choose Website Logo and Identity
The first thing you would want to do is manage your website’s identity. That includes your website title and logo.
For that, scroll down below on the customizer menu to see Site Identity under Core.
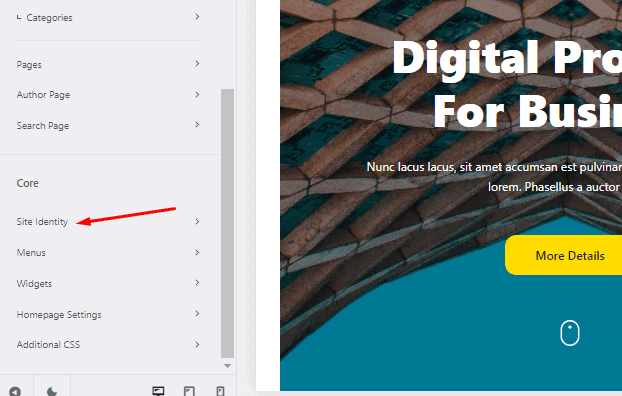
There, you can set up 3 different things that reflect the identity of your website.

Site Title – It has a text field where you should enter your website title i.e. name of your website.
Tagline – Here, you can type in a short description of your website. By default, it is filled with ‘Just Another WordPress site’. You can just clear it and enter your own.
Site Icon – Here you can upload the logo icon of your website. It works as the favicon – the icon that appears on the web browser’s tabs.

Configure Typography
The next thing you can do is configure the typography on your website. That includes font type, size, weight, spacing, etc.
To configure it, go to Typography under the General menu.

As you can see, there are lots of typography options for different fonts within your website. You would have to scroll to see all the options.

Firstly, you can choose a Base Font – the default or ‘Global’ font for your website. All the text elements on your website will pick the font from the Base Font if you have not set otherwise.
If you want to choose different fonts for other texts, then that’s possible too. More specifically, you can choose the fonts for all the headings (H1 to H6), buttons, blockquote block, and preformatted block.
For every element, you can configure the following things. For that, just click on the 3 dots next to each text type.
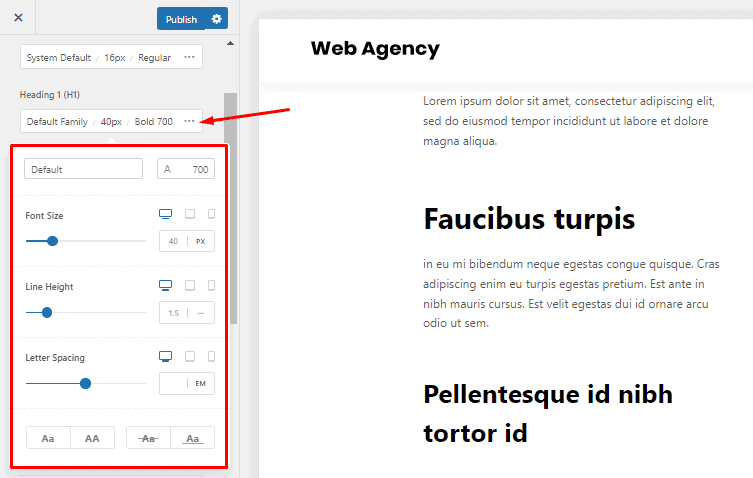
- Font type – Choose the font type for the text from the available options.
- Font size – Pick the sizes for the font. Make sure that the sizes are in order. For example – H1 should be larger than H2, and so on.
- Weight – Set up the thickness of the fonts.
- Line Height – Set the margin between the fonts.
- Letter Spacing – Set the space between each letter.
- Capitalize – Click to capitalize the first letter of each word.
- Uppercase – Click to capitalize all letters.
- Line Through – Click to add a line through the words.
- Underline – Underline every word.

We suggest not dwelling very long on it as the default fonts and typography options are pretty much set.
Select Brand Colors
Now, choosing to color is one of the important tasks you should take care of. The colors on your website reflect your brand. So, make sure you pick the right colors giving your website a unique brand identity.
To pick the colors, go to Colors on the Customizer under General Options.

As you can see, there you can set the colors for different website items like texts, headings, links, buttons, etc.

Firstly, you can choose the colors for the Global Color Palette. It consists of 8 different colors that appear throughout your website. If you click on the tiny dropdown next to it, you can see the suggestion for different palettes.

Besides that, you can choose colors for base text, link, link hover, borders, headings (H1 to H6), and background.
Manage Header
Now from here, you can manage the header of your website. For that, go to Header on the menu.
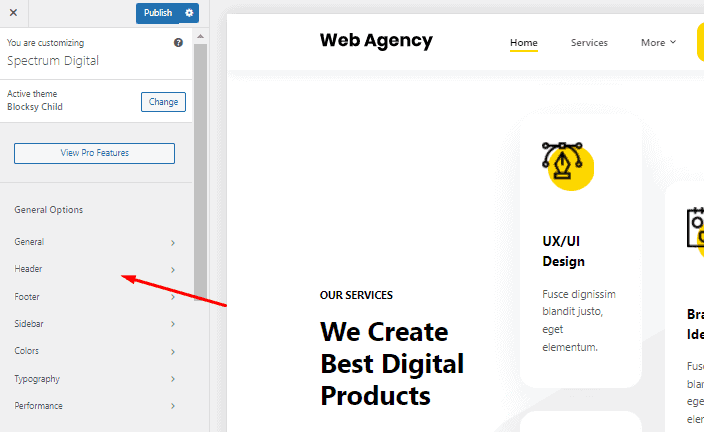
On the left, you can see the Elements that can be added to your header. Similarly, at the bottom is the header builder area consisting of 3 rows. Due to this, it’s possible to create 3 levels of menus.

To add elements to the header, you can simply drag the elements and place them to any of 3 the rows.

Further, you can edit each header element – just click on it to open its settings and make the changes.

If you want to remove an element from the row, just click on the cross button on that element.

After done, click on the Publish button at the top.
Manage Footer
Now, let’s see managing the website footer.
First, go to Footer from the customizer’s sidebar menu.

By doing so, you will reach the footer builder interface.
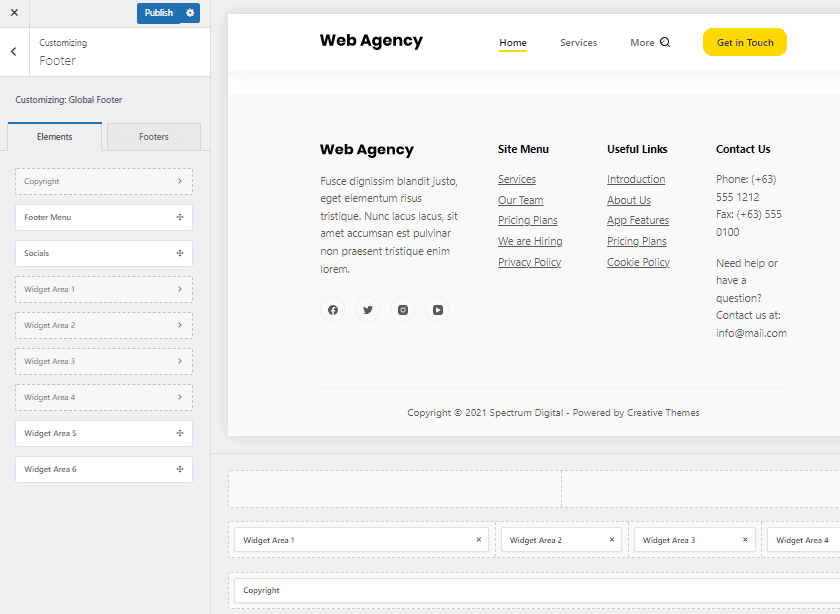
Similar to the header builder, the footer builder has the footer elements are on the left side that you can drag and place on the footer rows below.
Also, you can edit the item on the footer with the available options. Just click on the element and the editable options will show up.

To remove the footer element from the footer, just click on the cross button next to it.

Manage Sidebar
If you want sidebars on your website, you might as well manage their appearance.
For that, go to Sidebar from the menu on the customizer.

Now, there are lots of options that help customize the appearance of your website’s sidebar.
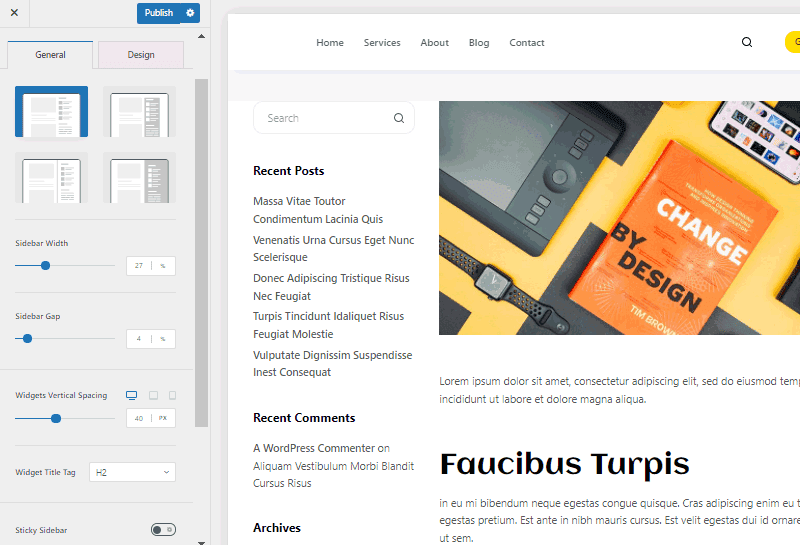
Remember that, here you will only find the designs set up for the sidebar, but not the content.
So, you will have the following major options for designing the sidebar.
Sidebar layout – It offers 4 designs to choose the sidebar layout
Sidebar width – With this option, you can set the width of the sidebar.
Sidebar gap – It lets you set the gap of the sidebar either on the left or right.
Sticky sidebar – This button fixes the sidebar so it doesn’t move while you scroll.
Mobile sidebar position – Choose where you want the sidebar to appear on mobiles – top or bottom of the page.
If you are all the way here, then you should check out our in-depth Blocksy Free Theme Customization Tutorial


WordPress Comments Overview – Access and Mange Comments