The tools and plugins recommend in the site are the ones we use, have tried or tested ourselves and recommend to our readers. Marketing With WP is supported by readers like yourself. If you take an action (such as a purchase) we might earn an affiliate revenue at no extra cost to you.
How to add a Category to Posts in WordPress Website?

WordPress allows grouping similar types of blog posts in sections called WordPress Categories.
You can create unlimited categories and sub-categories in WordPress and assign every blog post to the appropriate categories. This makes it easier for website authors & admins to manage the posts and for users to understand what the post is related to.
Moreover, categories also play an important role in SEO if you know how to use them properly.
Now, let’s see the process of creating categories in WordPress.
Go to Posts > Categories
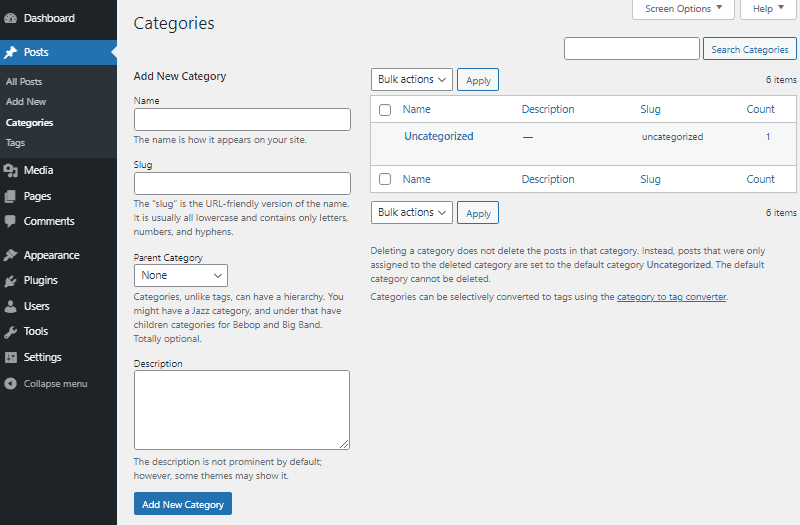
At first, go to your admin area and then, go to Posts > Categories.

On the next page, it will have the option to create new categories on the left side. Moreover, the existing categories are displayed on the right. Also, there is a search bar to find a category by its name or keyword.
On the categories list, you’ll see a category – ‘Uncategorized’ already there. It is the default WordPress category that will be selected for the blog posts that are not assigned a custom category.

Fill the Category Information
Now, to add a category, you’ll have to fill in some information.
- Name – Enter the name of the category here.
- Slug – Create a URL slug (extension) for the category.
- Parent Category – If you’re creating a sub-category, then select its parent category. If not, then leave it.
- Description – If you want, then add some information about the category.
Save the Category
After that, you can click on the Add New Category button.
Now, the newly added category will be added to the categories list.

In the above screenshot, we have added some categories. Also, we are adding a new sub-category filling up the fields.
Add Category to Blog Posts
Now, let’s try adding the new categories to the blog posts.
Categories can be added to a new post or an existing post. Also, there are two ways to do it –
1. Add a Category using Post Editor
While creating or editing posts, you can simply add categories to under the Post settings.
So, add a new post or edit an existing post that you want to add a category to. For now, let’s create a new post and add a matching category to it.
For that, go to Posts > Add New from the admin dashboard.

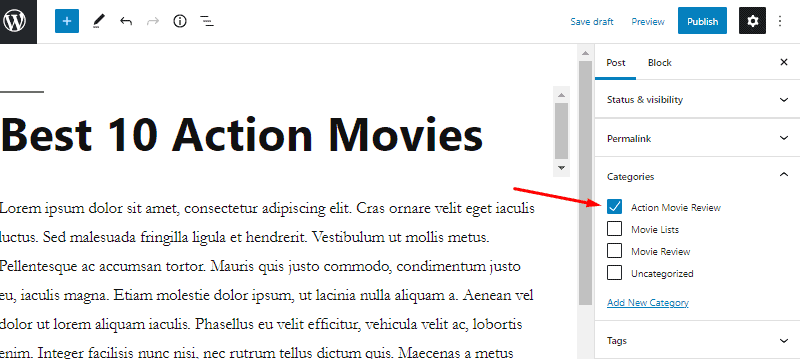
This will open the Gutenberg interface to add content for the post.
Anyway, on the right sidebar under Post, you can see the ‘Categories’ option.

Click on it and then, select the proper category for the post. You can select multiple categories as well if that fits.

After that, click on Save Draft or Publish to save or publish the post respectively.
2. Add a Category using Quick Edit Option
This option makes it easy and quick to assign categories to pre-existing posts on the All Posts page.
For that, go to Posts > All Posts to see all the available posts. After that, hover over the post and click on Quick Edit.

It will open the editing option on the same page. Under Categories, select the category for the post by checking the box.
By default, the category is set ‘Uncategorized’. Uncheck it if you want.
After that, click on the Update button to save the changes.


