The tools and plugins recommend in the site are the ones we use, have tried or tested ourselves and recommend to our readers. Marketing With WP is supported by readers like yourself. If you take an action (such as a purchase) we might earn an affiliate revenue at no extra cost to you.
How to Install a WordPress Theme?

One of the most important steps in starting a WordPress Website is to change the default WordPress theme. WordPress users like to use a theme that suits their brand or provides a certain functionality. This post covers ‘how to install a theme to your WordPress website”.
WordPress themes are the fundamental design frameworks for your WordPress website. It gives a proper look and feels and lets you customize the appearance of your website.
If you are a WordPress beginner, then you might have no idea on how to install a theme. However, there are a few ways to do that. And, we’re going to help you with that.
Let’s get started.
3 Different Ways to Install a WordPress Theme
You might be stunned to know that WordPress offers thousands of themes – 8,500+ in the WordPress theme directory alone, plus more in other theme stores and marketplaces. Since they differ in terms of size, price, features, and functionalities, they might have different ways to install.
As already said, you have 3 ways to add a theme to your WordPress site. And, they work for pretty much of any kind.
The available methods to install a WordPress theme are:
- Automatically from WordPress dashboard
- Manually by Upload Method
- Via FTP (File Transfer Protocol)
Now, let’s see the steps involved.
Option 1. Add Theme Directly from your WordPress Dashboard
The easiest and most popular way to add a theme is to search and install a theme from your WordPress dashboard. It’s the best way if you’re going to install a free theme from the WordPress.org theme repository.
Here are some of the most popular free WordPress themes you might want to check.
So, below are the steps you need to install from the admin dashboard.
Step 1. Login to your WordPress Admin Area
Whether you want to install a theme, plugin, or manage your site, you need to log in to your WordPress website. So, it’s the first step here.
To do it, enter your website login URL on a browser. It looks like this.
https://yourwebsite.com/wp-login.php
Remember: Replace ‘https://yourwebsite.com’ with your own website URL.

After that, hit your login credentials and click on the Log In button to enter the WordPress admin dashboard.
Step 2. Find the Theme from Theme Menu
Next up, you’ll have to search for the theme of your choice from the dashboard.
To do so, go to Appearance > Themes from the left sidebar menu.

There, you might see some of the default WordPress themes installed if you haven’t changed them in the past. Anyway, click on Add New you see on the screen.

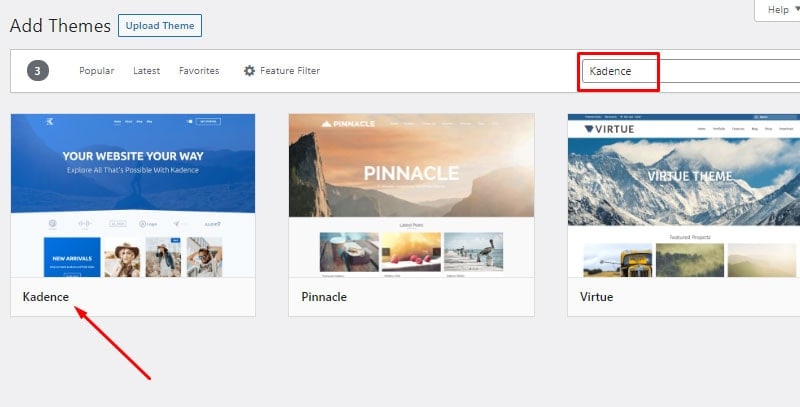
On the next page, you’ll see lots of different available themes. So, find the theme you want to install. You can use the Popular, Latest, Favorites, and Feature Filter tab to find your theme. Or, you can also search the theme by its name if you already have a theme in mind.

For demonstration, we’re using the popular free WordPress theme ‘Kadence’ here. It’s a multipurpose WordPress theme with easy customization and importable demo sites.
So, we’re searching for the theme Kadence in the search bar so that it comes up on the screen.
Then, the next step is to install the theme.
Step 3. Install and Activate the Theme
Now, you just have to install and activate the theme to start using it.
So, after you find the theme you’re looking for, just hover over it and click on Install Now. It will start installing the theme and takes some time to complete.

Once installed, the theme will show the Activate button in the same position. Just click on it.

By doing so, you’ll have successfully installed and activated your theme. It will also display you a success message like this. Also, you’ll be able to see your installed theme in the Themes menu.

After that, you’re good to configure and customize your design website according to the options you get with the theme.
Option 2. Add a Theme Manually by File Upload Method
The next method to add a theme to WordPress is by manually uploading a zipped theme file from your local PC to the WordPress backend.
This method is popular usually for installing a premium theme from marketplaces like Themeforest. Also, if you have a personalized or self-developed theme, then uploading is the right option.
Anyway, this approach to installing a theme is the best if you have it on your local PC.
So, let’s see the steps.
Step 1. Log in to your WordPress Website
It’s the same step as Step 1 of the first method.
First, you’ll have to log in to your WordPress dashboard by entering your login credentials on your WordPress page login URL.
Your website login URL is your website homepage URL followed by ‘/wp-login.php’
For example, if your WordPress website’s URL is ‘http://yourwebsite.com’, then the login page URL will be
https://yourwebsite.com/wp-login.php
There, enter your website login username and password. Then, click on Log In. Doing this will take you to your dashboard.
Step 2. Upload Theme Manually
Now, from your dashboard, go to Appearance > Themes, and then click on the Add New button you see on the top of the page.

Next, click on the Upload Theme button. After that, click on Choose File to choose the theme from your local PC.
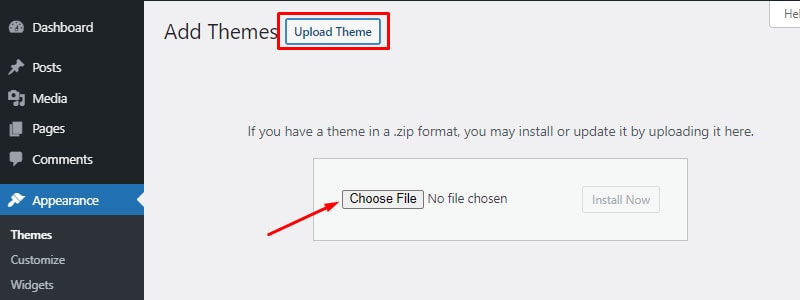
Then, browse and select the theme from your local directory. First, make sure that the theme is zipped.

Step 3. Install and Activate the Theme
After that, click on Install Now to start the installation process. It’ll take some time.

After successful installation, you can simply click on Activate to activate the theme and start customizing.

Following that, it’ll display the theme installation success message with the theme you just installed on the Themes menu on your dashboard.
Option 3. Install a WordPress Theme via FTP
Adding theme with methods 1 and 2 works almost every time. But, sometimes issues like host and site configuration might prevent you from installing the theme.
In such a case, you can take help from an FTP client software.
But remember that adding a theme via FTP is a little technical. So, we recommend you to stick with the above 2 methods.
So, let’s see how you can add a theme to WordPress using FTP.
Step 1. Install FTP Client on your PC
The first thing you need is an FTP client tool on your computer. It lets you connect your WordPress hosting account with your local drives.
Some of the available FTP clients are FileZilla, Free FTP, CyberDuck, etc. You can use any of them. We usually use FileZilla because of its good interface and ease of use. So, we’re going to demonstrate it with FileZilla.
To install it, go FileZilla website and download it to your system, and run the setup.
Step 2. Connect Your WordPress Hosting with Local PC using FileZilla
The next step is to connect your WordPress hosting with your local computer with FileZilla.
For that, open FileZilla you just installed on your PC. You’ll see your PC’s folders under Local Siteon its left-hand side.
Now, to establish the connection, it requires you to enter the connection credentials i.e. Host, Username, Password, and Port.

Now, in the host field, just enter your website domain name with the prefix ‘ftp://’.
Example: ftp://yourwebsite.com
Or, you can also enter your FTP IP there. You can get it from your web hosting dashboard or CPanel.
Next, you’ll need your FTP username and password which you’ll find in the hosting dashboard. Else, you can take help from your hosting support.
In the Portfield, enter ‘21’ or try leaving it blank if it doesn’t work.
After entering all the credentials, click on the Quickconnect button.
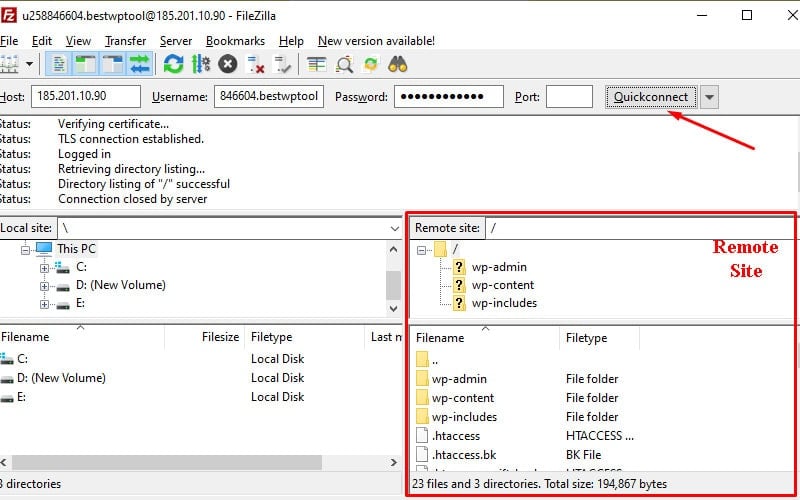
After connecting, you’ll see your WordPress website files on the right-hand side under Remote Site.
Step 3. Upload the Theme
Now, the next step is to upload the theme from your local PC to the WordPress directory. This means that you just have to copy the theme files from left to right in FileZilla.
Remember that the theme should be unzipped this time. If it’s still zipped, you should unzip it first.
Now, from the left side i.e. local site, browse to the folder containing the theme you’re going to install.
Similarly, on the right-hand side i.e. remote WordPress site, browse to
wp-content > themes
It’s the folder where your WordPress themes reside.
Now, right-click on the theme folder and click on upload.

This will take some time to copy the folder from your local PC to the themes folder in your WordPress site.
After completing it’ll display a notification of successful transfer. Then, you can terminate FileZilla.
Step 4. Activate the Theme
Now, the last step is to activate the theme from the dashboard.
So, go to your dashboard. Under Appearance > Themes, you’ll see the theme you just transferred.
You’ll see that it’s not activated yet. So, just hover over the theme and click on the Activate button.

After that, you’re all done and you can start customizing the plugin.
Conclusion
Now you should be able to change the theme of your liking.
As mentioned previously, installing a theme directly from the dashboard is the easiest method for installing free WordPress.org themes. Whereas uploading theme manually is useful if you want to install a premium or a self-made theme. And finally, use the FTP method if both previous methods give error or issues.
We also have a list of the most popular Free WordPress themes. Otherwise, you can also look into how to install a plugin to your WordPress website.
If you are new to WordPress, we highly recommend reading our comprehensive guide on essential things to setup on your WordPress Website to get more visitors.


