The tools and plugins recommend in the site are the ones we use, have tried or tested ourselves and recommend to our readers. Marketing With WP is supported by readers like yourself. If you take an action (such as a purchase) we might earn an affiliate revenue at no extra cost to you.
How to setup WordPress Discussion Settings?

Next up, we have the Discussion Settings where WordPress admins can manage options relating to comments on WordPress blog posts.
It has lots of tweaks and adjustments like email notification, pingbacks, trackbacks, comment sorting, avatars, and so on.
You can find the Discussion settings in Settings > Discussion.

So, let’s go through the available settings.
Default post settings
The default post settings have these options.
Attempt to notify any blog linked to from the post
WordPress has the feature to notify (ping) blogs whenever other websites or blogs link to them.
And, checking the ‘Attempt to notify any blog linked to from the post’ option will activate this feature.
Doing so, the pings from the mentions will appear in the comment section on their site if they have activated pingbacks.
Allow link notifications from other blogs (pingbacks and trackbacks) on new posts
If you tick on this checkbox, then your website will accept pings from other websites if other websites or blog posts are linking to you.
It’s up to you to accept or decline the pingback request. If you accept it, then the link to the page mentioning your blog (article) will be added to your comment section.
Allow people to submit comments on new posts
If you want to let your audience comment, then you should activate this option by checking it. However, you should know that commenting will depend on the status of individual posts.
Other comment settings
Comment author must fill out name and email
You might only want genuine users to leave comments on your posts. To prevent bots and spammers from commenting, you can enable entering the comment authors’ names and email mandatory.
You can simply check the box so that your website will ask the name and email address of the users before commenting. This will also let you know the details of the comment authors and reduce negative/spam comments.
Users must be registered and logged in to comment
Checking this option will enable only the registered and logged-in users to comment on your post. If it’s unchecked, then any visitor can leave unlimited comments.
Automatically stop comments after a certain number of days
This feature will stop the access to commenting after certain days. If you want to enable this feature, just click on the checkbox. Also, you can enter the number of days after which the comment feature is disabled in posts.
Show comment cookies opt-in checkbox
This will save users’ information in their browser so that they can leave their comments easily next time.
Enable nested comments
If you want to enable threaded comments on your blog, then check this option. With that, users can leave replies to other comments.
Also, you can enter the levels of replies a comment can get. By default, it’s 5.
Break comments
This lets you create pagination for the comments with a certain number of comments per page at most.
You get to enter the number of comments it displays per page and choose the first or last comment page to display at default. Also, you can choose whether to display newer or older comments on top.

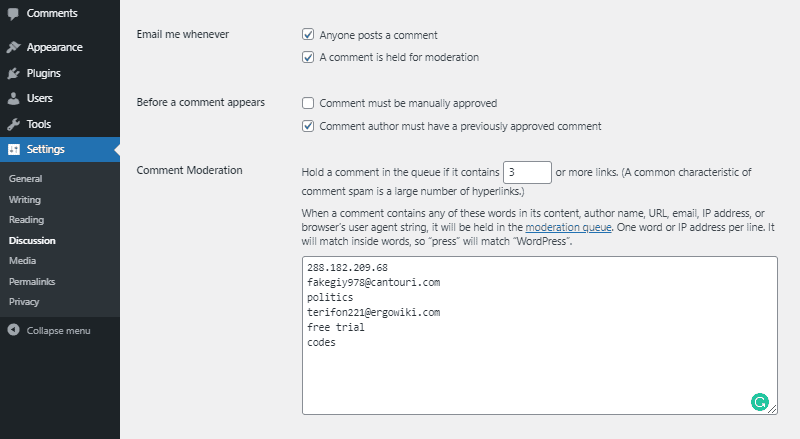
Email me whenever
You can choose to receive an email notification when certain events occur on your blog posts.

Anyone posts a comment
If you check this option, you’ll receive an email when users post a comment on your posts. Receiving a large number of comments might fill up your email inbox. So, make sure to uncheck this box if you don’t want to receive comment emails.
A comment is held for moderation
It’s important to review users’ comments before publishing on your posts to prevent spam comments, link promotions, and negative comments. So, you can choose to hold comments for moderation.
So with this feature, you can choose to receive emails for new comments that add up in the moderation queue. Just check the box to activate the feature.
Before a comment appears
This setting lets you choose if you want to display the comments right away or after approval.
- Comments must be manually approved – Check this option if you want to approve comments manually after reviewing.
- Comment author must have a previously approved comment – If a user has previously approved comments from some authors, then chances are they are genuine. So, checking this option will approve the comments of previously approved users automatically.
Comment Moderation
Here, you’ll find the options for holding comments in a queue to prevent them from posting automatically. This will help prevent spam comments. The available options for comment moderation are discussed below.
Holding a comment with links
You can choose to hold a comment containing a certain number of links in it. In addition, you can enter the number, so that a comment containing a minimum of that number of links will be on hold.
For example, if you enter ’3’, then a comment containing 3 or more links will stay on the moderation queue.
Holding a comment with specific content
WordPress lets you keep comments with certain content on hold. You can enter the author name, suspected URL, email, IP address, etc. that might seem like spam or unethical to be displayed publicly. Then, your website will keep comments containing those content in moderation.
Comment Blocking
Here, you can enter the spammy words, URLs, IP addresses, etc. that might be spammy. But here, the comments containing these words will be automatically deleted.

Avatars
Avatars are the images that appear as display pictures of the comment authors. The avatar settings let you enable or disable avatars for people commenting on your website. Here are some useful avatar settings.
Avatar Display
You can use the checkbox to enable or disable the displaying of comment authors’ avatars.
Maximum Rating
It has the option to display only the kind of avatar suitable for your audience. It has the following ratings for avatar –
- G – suitable for all audiences
- PG – Possibly offensive, usually for audiences of age 13 and above
- R – Intended for adult audiences above 17
- X – Even more mature than above
Now, you’ll just have to select the rating suitable for your audience.
Default Avatar

In this setting, you get to choose the default avatar for users without their own logo or avatar. WordPress offers to display a generic or a generated log based on the users’ email addresses. The available options are
- Mystery person
- Blank
- Gravatar Logo
- Identicon
- Wavatar
- MonsterID
- Retro
After configuring all the settings, save the settings by clicking on the Save Changes button.


