The tools and plugins recommend in the site are the ones we use, have tried or tested ourselves and recommend to our readers. Marketing With WP is supported by readers like yourself. If you take an action (such as a purchase) we might earn an affiliate revenue at no extra cost to you.
How to Edit Users in WordPress?

Next up, we will see editing users in WordPress.
This includes editing names, roles, email, bio, color schemes, etc. for the users. This also includes providing some additional access like the visual editor, keyboard shortcuts, toolbar, etc.
So, let’s see all the options you get while editing a user.
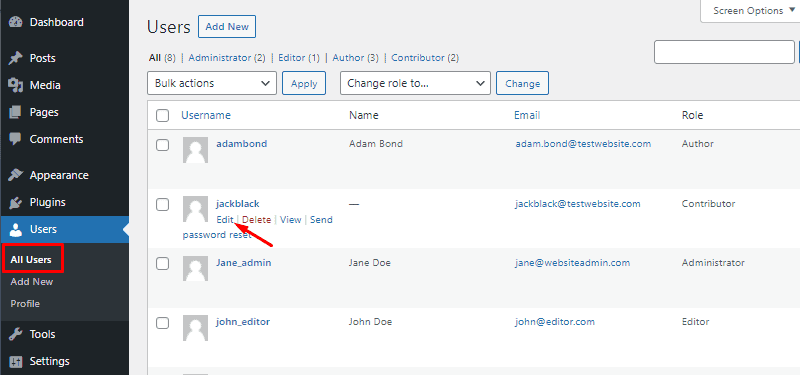
Step 1: Go to Users Dashboard
First, go to Users > All Users to find the list of all the users.
From there, hover over the user you want to edit.

Step 2: Edit User Details
On the next page, you can see all the editable options.
Personal Options
- Visual Editor: It has the checkbox to disable the visual editor when writing. Checking this box will disable the Gutenberg editor on the user’s end. This is good for the users who prefer creating posts with HTML.
- Admin Color Scheme: It offers 9 different color schemes to pick from. This will change the theme and layout color of the admin dashboard for that user.
- Keyboard Shortcuts: Check this box if you want the user to moderate comments by shortcut keys on the keyboard.
- Toolbar: It has the checkbox that controls the appearance of the toolbar at the top of your website when on the website frontend.

Name
- Username: Under Name, the first option is the Username. However, it cannot be changed.
- Role: Here, you can change the user role from the dropdown menu. It has the same basic options – Administrator, Editor, Author, Contributor, and Subscriber.
- First and Last Name: Simply, enter the first name and last name of the user. If you have already entered the names while creating the user, you can also change them as well.
- Nickname: The Nickname field is required. By default, your username is auto-placed on the nickname field. However, you can change it using letters, special characters, and numbers.
- Display name publicly as: Here, you can see the dropdown containing the different possible names that you want to display. The suggestions derive from the name, nickname, and username you enter above.

Contact Info
- Email: Here, you can change the email address of the user. Just clear the previous email address that’s already there and enter a new one.
- Website: Enter the website URL of the user if available.

About the user
- Biographical Info: Here, you can type in a bio or introduction of the user if you want. The biographical is displayed below each post published by the writer if that’s enabled on your website.
- Profile Picture: Here you can see the profile picture of the user if he/she has signed up for a service like Gravatar. Only the users themselves can add, change, or delete their profile pictures.

Account Management
- New Password: You can create a new login password for the user from here. Just click on Set New Password and enter a new password you want.
- Password Reset: It lets you send the user the link to reset the password.

Step 3: Confirm Update User
After you have edited the user, don’t forget to click Update User to save the changes.


WordPress Comments Overview – Access and Mange Comments