The tools and plugins recommend in the site are the ones we use, have tried or tested ourselves and recommend to our readers. Marketing With WP is supported by readers like yourself. If you take an action (such as a purchase) we might earn an affiliate revenue at no extra cost to you.
How to Add a New Page in a WordPress Website?

Let’s find out how to create a new page and edit various options within a page in WordPress.org CMS. Moreover, we will cover how to use the default Gutenberg blocks and use various features within the block builder to create the perfect page for your website.
A page (web page) is a document, typically static, that consists of a specific type of content. The content of a page is rarely changed. For example – the about page, contact page, product display, landing page, home page, etc. are the different types of pages on a website.
Now, let’s see how to add a page in WordPress.
Go to Pages > Add New
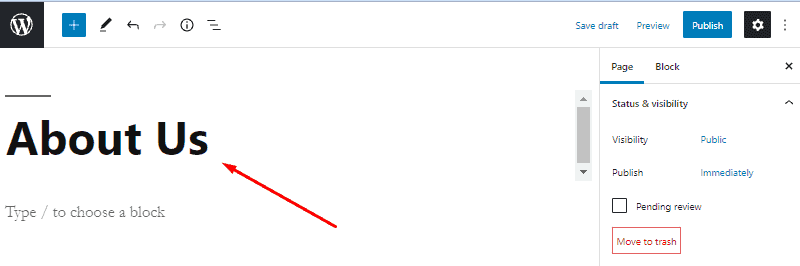
At first, you should navigate to Pages > Add New from the dashboard.

By doing it, you’ll reach the default WordPress page editor – Gutenberg. Gutenberg offers dedicated elements called blocks for adding content to the page. The blocks are distinct, act as a single unit of content.
On the right of the interface, you’ll see the page settings for configuring page options and block settings for configuring selected Gutenberg blocks. Similarly, on the top, you’ll see options like publishing, previewing, page details, etc.

Add Page Title
Now, start with entering the title of the page. The title of the page is what distinguishes it from other pages on page lists and menus.
Also, the page title likely becomes the permalink (URL) of the page too.
So, be sure to enter the appropriate title that properly describes the page.
Start Adding Content with Blocks
Next, you can move ahead to adding content on the page with the Gutenberg blocks.
First, choose the block by clicking on the plus (+) button you see on the top-left or the editing screen of the page. Or, you can also type a slash (/) to quickly select a block by typing. Then, select the suitable block from the list. Also, configure the block settings from the right sidebar.

/image – add block
Now, some of the common types of blocks useful for creating WordPress pages are listed below.
- Paragraph – It’s the default block that allows you to add written content on WordPress pages.
- Heading – It’s useful for adding headings on your page for organizing the content structure. The heading block also lets you choose the appropriate level of heading up to 5 levels deep – h2, h3, h4, h5, and h6.
- List – With the lists block, you can add items to a list. A list can be ordered (numbered) or unordered (bulleted).
- Quote – The Quote block is useful if you want to highlight your text.
- Image – It simply lets you add images. For that, you can either choose the images from the media library or upload them directly from there.
- Spacer – It allows you to add space between block content.
- Table – The table block is useful to add simple tables in WordPress. After selecting the table block, it lets you define the number of rows and columns for the table.
- Cover – The cover block lets you create beautiful headers with images, colors, gradients, and overlaying texts.
- Buttons – The Buttons block lets you create buttons and link other pages and posts to it.
- Columns – The Column block lets you create multiple columns and add different other blocks to each of them.
Manage Page Settings
To manage the page settings, click on Page at the right sidebar.

From here, you can do the following things.
Set post visibility
From here, you can set who can view this page. It has 3 options to choose from.
- Public – Select this option to make the page visible to everyone.
- Private – This option makes the page invisible to the general public. Only website admins and editors can see this page if you make the page private.
- Password-Protected – This enables you to create a password and only the users with the password view the page.
By default, the post visibility is public. If you want to change it, then click on it and select another option.

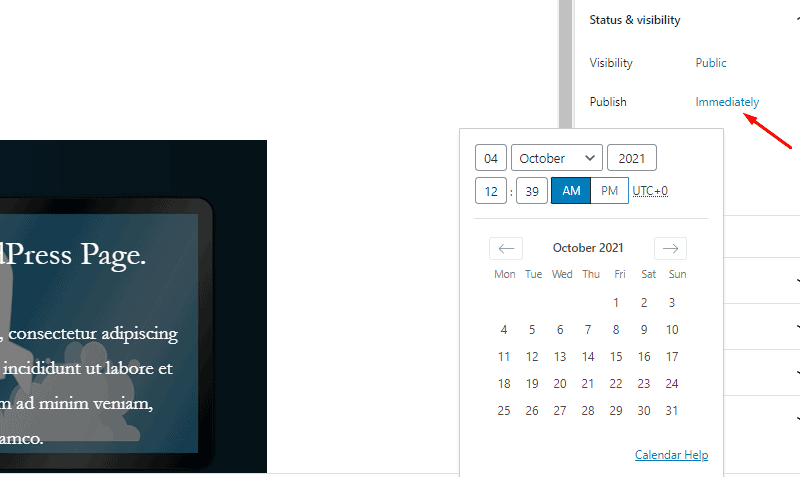
Scheduled Publish Date
WordPress offers a page scheduling option that lets you choose if you want to publish the page right away or choose any date/time.
By default, it’s set to ‘Immediately’ meaning that the page will be published instantly if you click on the Publish button.
If you want to schedule it for the future, then click on ‘Immediately’ to pick a date and time from the calendar.
Create a custom permalink
We have already discussed permalinks and ways to set the default permalink extension structure in WordPress.
In addition, WordPress allows creating custom permalinks for each page. For that, click on Permalink on the sidebar. Then, enter the custom URL extension (slug) there.

You can see the full permalink of the page just below it.
Set a featured image
A featured image is the image that represents the page content and works as a thumbnail for the page. It’s the image that shows up on social media chats and walls when shared.
To upload a relevant featured image to a page, click on Featured Image at the right sidebar of the page editor.
Then, click on Set Featured Image to select one.

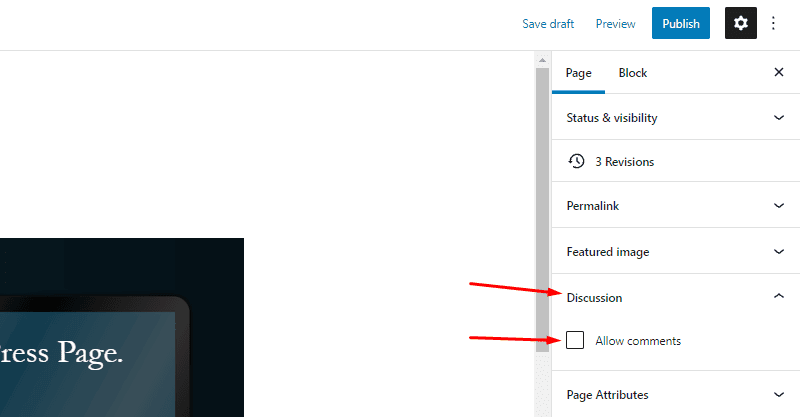
Allow discussion (comments)
Next, you can choose to let the audience comment on your pages. However, this feature is not practical for WordPress pages.
If you want to do it anyway, then click on the Discussion tab and check the box next to Allow comments.
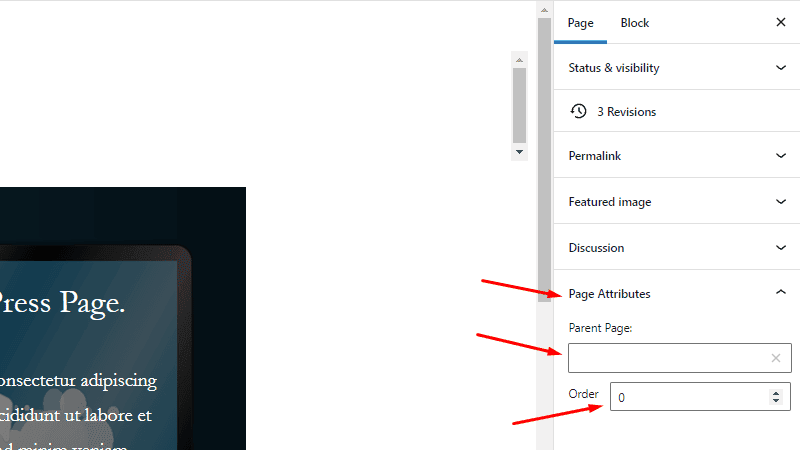
Configure page attributes
Lastly, the Page Attribute option lets you choose a parent page to your current page under creation.
This feature might not be useful to you for a start. However, it’s applicable if you want to create a hierarchy of pages.
To select the parent page for the page, click on Page Attributes and select an existing page on the Parent Page option.
Below that, you can also create the order of appearing of the page you’re creating.
Save Draft, Publish, and Preview
After you’re done creating a new page, there are a few options for you – save a draft for the future, publish right away, or preview the page. The options are available on the top right of the page.
Save draft
With the save draft option, you’ll save the content and all the changes, but it’s not published on the internet. If you haven’t completed creating or making changes to a page, then you’ll save it as a draft so that you can resume it and publish a complete version later.

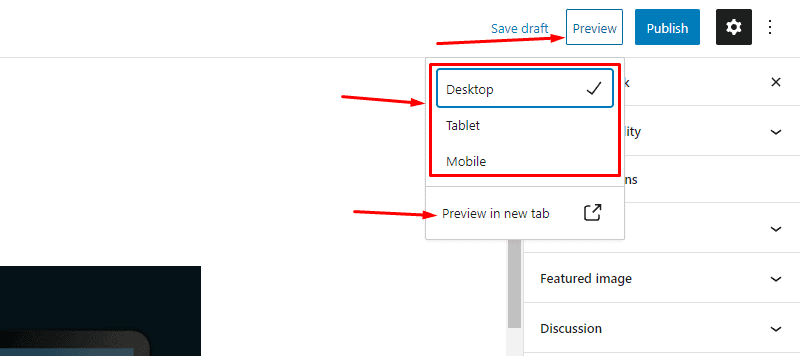
Preview
The Preview option lets you see how it appears on different types of devices – desktop, tablet, and mobile. Just click on Preview and click on the device you want to see your page on.
You can also open the preview on a new tab.
Publish
Finally, click on Publish to make the page go live.
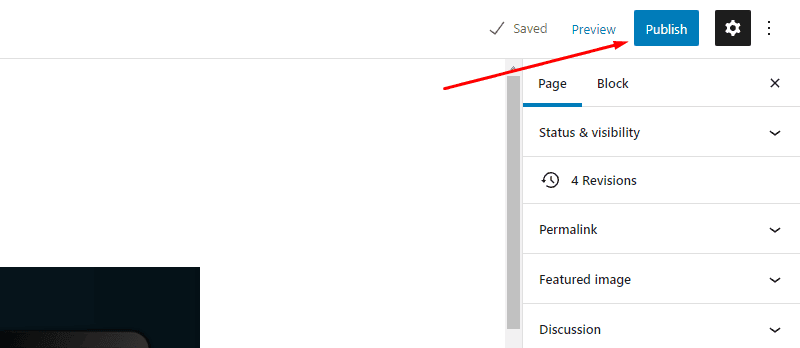
It’ll let you double-check the page’s visibility and publishing schedule settings. If everything is fine, then click on Publish once again.


WordPress Comments Overview – Access and Mange Comments