The tools and plugins recommend in the site are the ones we use, have tried or tested ourselves and recommend to our readers. Marketing With WP is supported by readers like yourself. If you take an action (such as a purchase) we might earn an affiliate revenue at no extra cost to you.
How to Add a New User in WordPress?

Now, let’s see we can add new users to your WordPress website.
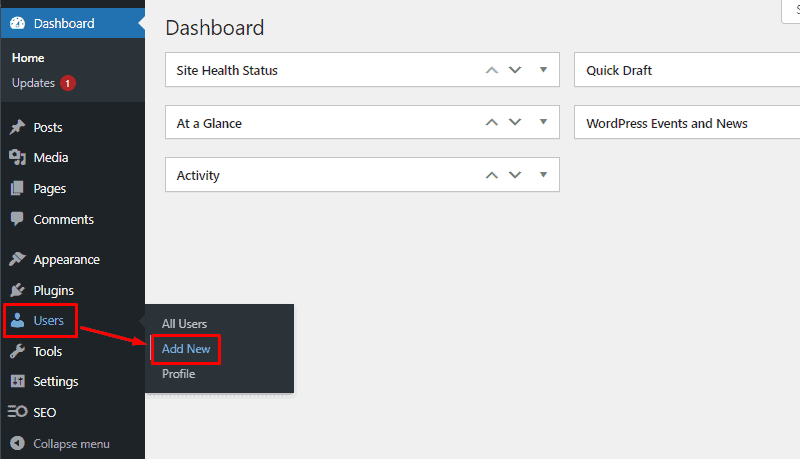
Step 1: Go to Users Dashboard
From your WordPress dashboard, go to Users > Add New first.

Step 2: Enter User Details
On the next page, it asks you to fill out some details for the user you want to add.
The fields are –
- Username: Here, enter a unique username for the user. It will be displayed on the website backend and also useful while logging in to the website. Entering the username is mandatory for creating a user.
- Email: Enter the email address of the user. The user will receive the website notifications at the email address you enter here. Similarly, the user’s email is also required.
- First name: Enter the first name of the user.
- Last name: Enter the last name of the user.
- Website: If the user has a personal website, then enter its URL here.
- Password: Here, enter the password that the user can type in to log in to your website. You can also generate a suggested password by clicking on the Generate Password button.
- Send User Notification: Tick on the checkbox to send users an email about their account creation.
- Role: Select the user role from the drop-down menu.

Step 3: Confirm Add New User
After done, click on Add New User at last.
Step 4: Confirm User is Added
Its better to confirm is the user is added to the website or not by visiting the list of users.

To see all the users on the website, you should go to Users > All users. It will display the users with names, emails, and other information.


