
Tutorials to make your website a 24 hr marketing machine

Tutorials to make your website a 24 hr marketing machine
Teachable Review
If you are a professional wanting to monetize knowledge by selling online courses, then an online course platform is the best option for you. These platforms help you with hosting courses, creating an online portal, designing the website, and setting up payment gateways for your students to buy your content easily.
Teachable is one of the most popular online course platforms with over 100,000 creators selling over a billion dollars in courses. Users love Teachable for its ease of use, design options, analytics, integration, and usefulness for membership, courses, and coaching.
In this review, we will go through Teachable’s features, course creation experience, pros, cons, cost, and real user reviews.
Teachable Overview
Teachable is an intuitive platform that lets you create courses and sell them online. Along with that, it provides all the tools you need to sell memberships and coaching services as well.
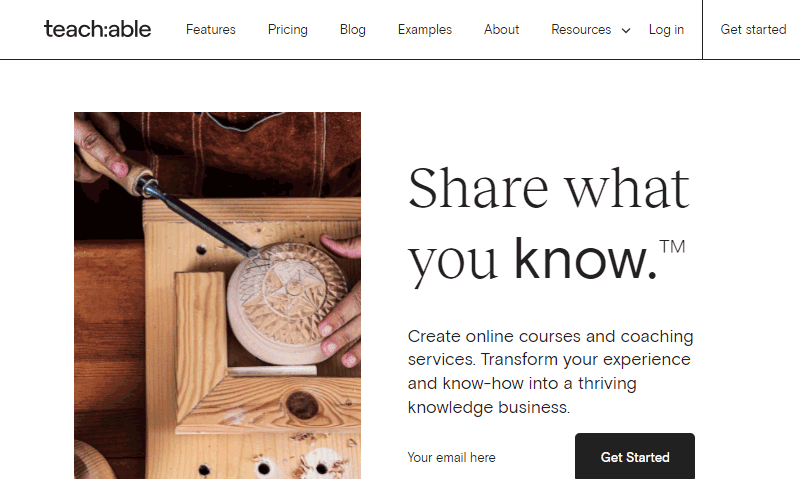
Creating courses with Teachable is easy as it is provided with a plain and simple admin interface. In addition, you can manage your online school with your own branding on your own terms.
Also, designing your online presence is up to you. You can create a professional-looking website with a number of pages like sales page, course page, checkout page, etc. with Teachable. Plus, it’s supported by a drag-and-drop editor so you require no technical knowledge for placing course content and page elements.
Moreover, you get a Teachable sub-domain for your site where users can log in and access the courses easily. And, you can also connect it to a new domain if you want.
For creating courses, it offers unlimited hosting for videos and other content formats with high bandwidth. In addition, you will have the options to upload course content from third-party tools, add quizzes, content dripping, certifications, etc.
Moreover, there are lots of features for adjusting prices and payment models, marketing, integration with third-party tools, and so on. We will see that below.
Who is Teachable best for?
Teachable is best suited for beginner course creators who want a cheaper starting point, unlimited content hosting and do not already have complete course system in place. Teachable’s free plan is undoubtedly one of the biggest attraction for beginner course creators.
It will not have the advanced features when you start small, but it can host your unlimited courses making them ready to sell.
As you start to enroll lots of students and earn substantially, you can also scale up to the higher, feature-rich plans.
Moreover, Teachable offers creating coaching services as well. So, if you are to offer one-on-one coaching services with your clients, then you should go for Teachable.
What more Teachable offers than other platforms is the slick design. The page templates and elements are attractive making the overall user experience on users on your Teachable website amazing.
Teachable Features
Let us take a look at some of the most standout features of Teachable.
Free Plan
One of the best aspects of Teachable that users love is its free plan. And, it’s not quite as limiting as other tools, Teachable lets you create a fully working online teaching platform with all the basic features you will need.
Firstly, you will have the potential to create unlimited courses with unlimited video hosting even on the free plan. Also, you can set up the pricing as you see perfect and earn by enrolling unlimited students.
Not to mention other features like email support, PayPal & Stripe payment integration, design templates, basic quizzes, student management, etc.
For all that, Teachable only cuts a fee of 10% from each transaction. This seems a pretty good deal.
User-friendly
The admin area of Teachable is very straightforward that helps you surf through and navigate the interface very easily. The menu items are stacked in a nice list so that creating & publishing courses, creating landing pages, managing teachers & students, pricing & refunding, checking analytics, all become convenient.
Since it saves a lot of your time and handles all technical aspects, you can focus on creating courses, marketing, and selling.
With quick links on the dashboard home pages, you can carry out important tasks like creating a course, designing pages, domain setup, etc.
Talking of creating courses, the course creator interface makes it really easy for you – it starts with the course title, then adding sections (modules), lectures, uploading course content (video, text, quiz, etc.), adding prices, and publishing, all from a super-simple interface.
Unlimited Videos and Course Hosting
Hosting high-quality, lengthy videos could be a problem for many course platforms, but not with Teachable.
Actually, Teachable is one of the best solutions for hosting a large volume of data. Even in the free plan, you upload unlimited courses with no limit on storage space. However, the size of each individual file should be below 2 GB.
Note that Teachable primarily supports and recommends the videos of formats .mp4, .mov, & .avi. Plus, the resolution of 4k or 1080p, and a frame rate of 24 to 30 fps are good.
Along with the videos, obviously, you can also host various other types of content like audio, plain text, PDF files, quizzes, images, etc. With that, you can create a variation in the content of the course.
Also, Teachable is capable of hosting webinars, live streams, etc. with the help of Zapier integration.
Course Pricing Flexibility
Teachable allows you to have full control of assigning the pricing of the courses and coaching services. And, there are 4 models of pricing plans. They are –
- Free – It lets you offer your courses or coaching services for free. It also lets you limit the access duration of the product if you want.
- One-time Purchase – It lets users buy the product by paying it one time.
- Subscription– With the subscription method, you can charge users a certain amount frequently on a timely basis. It also has the option of offering a free trial to give your customers a short experience with your courses.
- Payment plans – With the payment plan, you can set up monthly payments for a certain number of times.
You can also have more than 1 payment plan for each course as well.
Design and Customization
Teachable has a way with the website design and customization. Firstly, you get to set the theme for your website that gives your brand identity. You can choose images for your logo, school thumbnail, and favicon that appear throughout the website.

In addition, it lets you choose global fonts and colors for headers, footers, buttons, links, texts, video players, etc.
Now, for creating pages it offers premade content like banner, video, image, course curriculum, text with image, custom HTML, pricing, products, etc., and lets you add them to the pages as blocks at appropriate places. You can also design each of the content blocks with respective options.

Custom domain and white label
Teachable lets you choose your own domain name for your course platform setup.
Firstly, you get to create multiple sub-domains for your Teachable website. You can pick a primary one and redirect others to it.
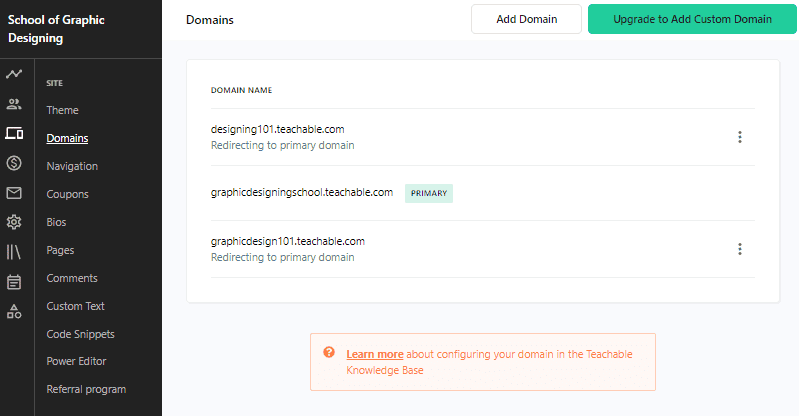
But, remember that your website on the free plan will always be the subdomain of Teachable. For example, you can have your sub-domain like this:
makecoffee101.teachable.com
Now, if you want to remove the Teachable branding from the URL, you can connect your website to a custom domain. For that, you need to buy a domain from a domain registrar like NameCheap, BlueHost, GoDaddy, etc.
After that, your domain can look like this for example:
makecoffee101.com
Note that, adding a custom domain is available only in the paid plans of Teachable. Anyway, upgrading to a paid plan will make your e-learning portal more brandable by removing the mention of ‘Teachable’ on different pages, courses, and footers.
Integration
Integration helps you add functions on your teachable site. The term integration means connecting a piece of software to another for making them work together to achieve a feature.
Like most LMS platforms, Teachable also has integration for email marketing, CRM, Analytics, exams, engagements, etc.
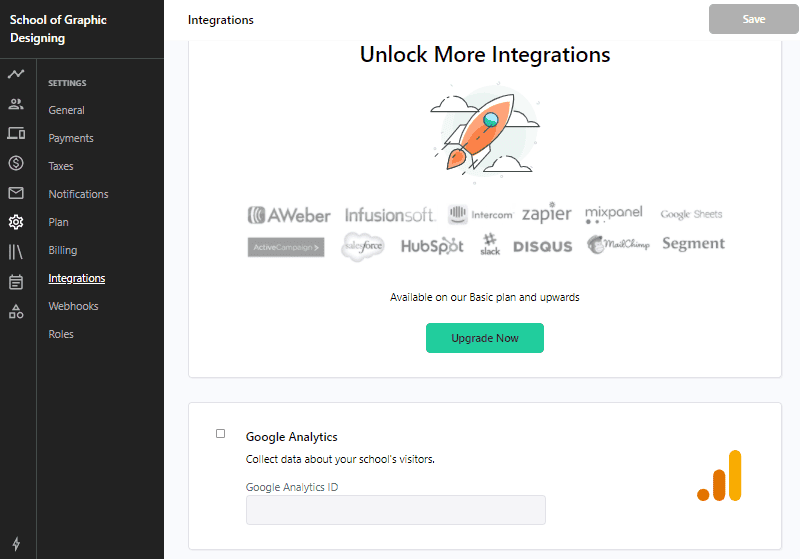
Namely, some of the available integrations for Teachable are:
- Circle.so
- Google Analytics
- Facebook pixel
- Mailchimp
- ConvertKit
- Sumo
- Segment
- Zapier
Moreover, Teachable makes it possible to integrate other third-party apps using Webhooks.
In-depth Analytics
Teachable has a great focus for numbers – it lets you keep track of your potential customers, enrolled students, student progress, revenue generated, etc. It has a pretty comprehensive dashboard making it easy to observe everything happening on the platform at any time.
Firstly, it helps you keep track of the numbers of the visitors on your Teachable page and the number of visitors converted to customers.
Especially with the integration with Google Analytics, you can also track how they find your site’s link, what their demographics (age, gender, location, etc.) are, how much time they spend on your site, etc.
More importantly, you will have some advanced tracking and reporting options provided by Teachable itself. With that, you can see how well the students are engaging with the course, how much they have completed. Also, the reports from quizzes and assignments help you know how well the students are learning.
If you are on the Pro or Business plan, then you can set up your own affiliate program and track its progress as well.
Coaching services
Just like the courses, Teachable lets you sell coaching services. Here, you can schedule time and calls with the clients on a one-to-one basis for counseling, tutoring, appointments, and different other purposes.

The Coaching product of Teachable consists of Milestones which are used to schedule meetings, messages, video calls, etc.
To enroll the clients for your coaching services, you have 3 options –
- Direct – clients can sign up and enroll directly.
- With an intake form– clients should fill out a form before checkout.
- With your approval– You can review the clients’ forms and choose to approve or decline them.
Also, creating the pricing plan for the coaching service is easy. Just choose the model of pricing – one-time, subscription, or payment plan. You can also offer the service for free or give users a free trial (if on the subscription plan).
How to create an online course with Teachable?
Until now, you should have a good perspective of what Teachable is capable of. Now, let’s see how to get started with Teachable and create an example course. If you want to give it a spin, then do it along with us.
We are just going to navigate through the free version and see what it takes to create courses. So, there is no need to spend any money on it for now. Also, this platform makes it really easy to create an entire website without any code or technical knowledge.
So, let’s start now.
Sign up to Teachable
The very first step is to sign up for the program.
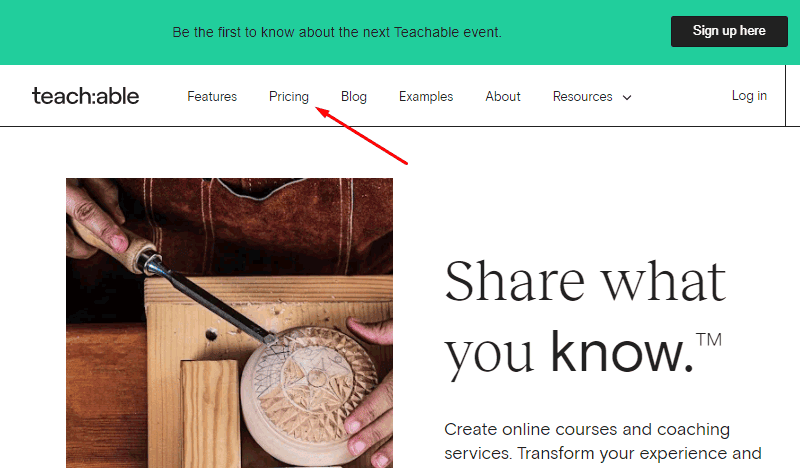
For that, go to the Teachable website and click on Pricing to open the pricing page.
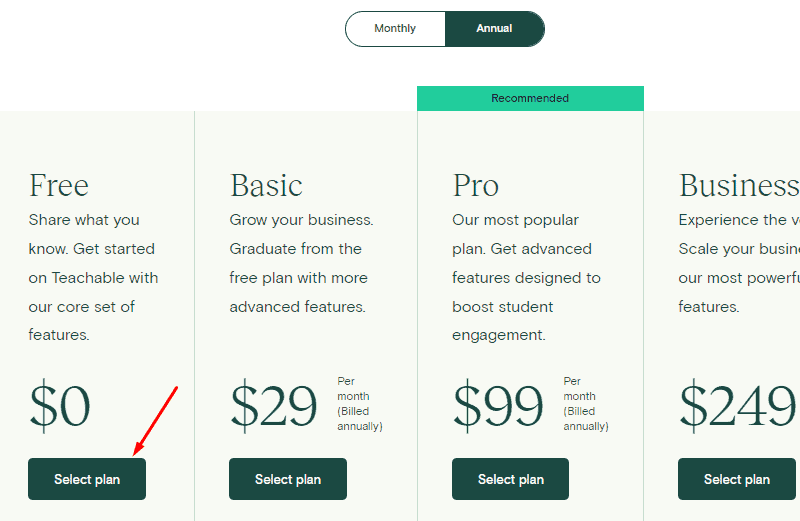
After that, scroll down below to the available packages and choose the free plan. Just click on the Select Plan button below the free plan options.
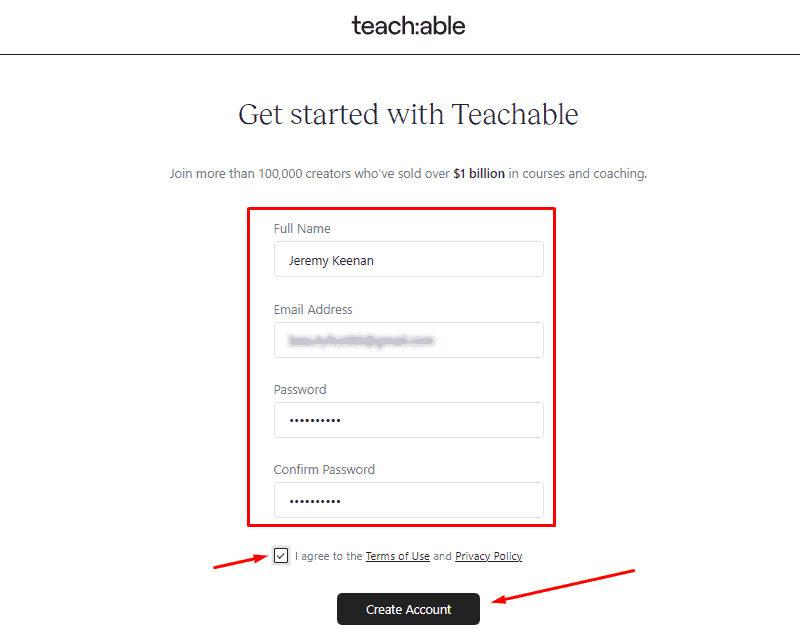
Enter your name and email, and then generate a password on the next page. Don’t forget to click on the check box before clicking on Create Account to accept the terms and conditions.
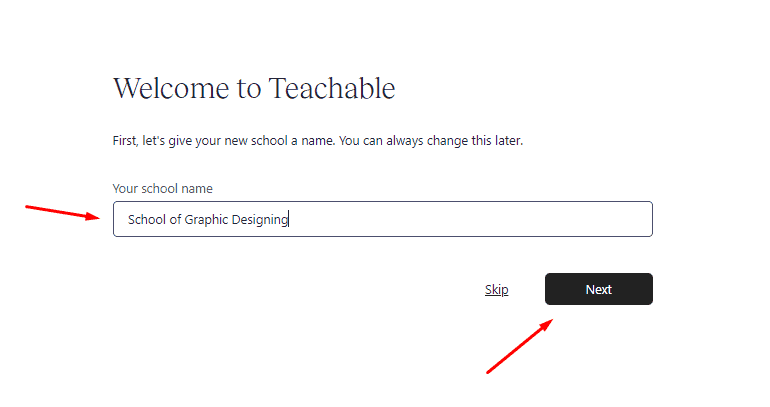
On the next step, it will ask you to enter your school’s name, which will also become your sub-domain.
Then, it requires you to fill in some information about your experience and business before it takes you to your admin dashboard.

This is what your dashboard looks like first-hand.
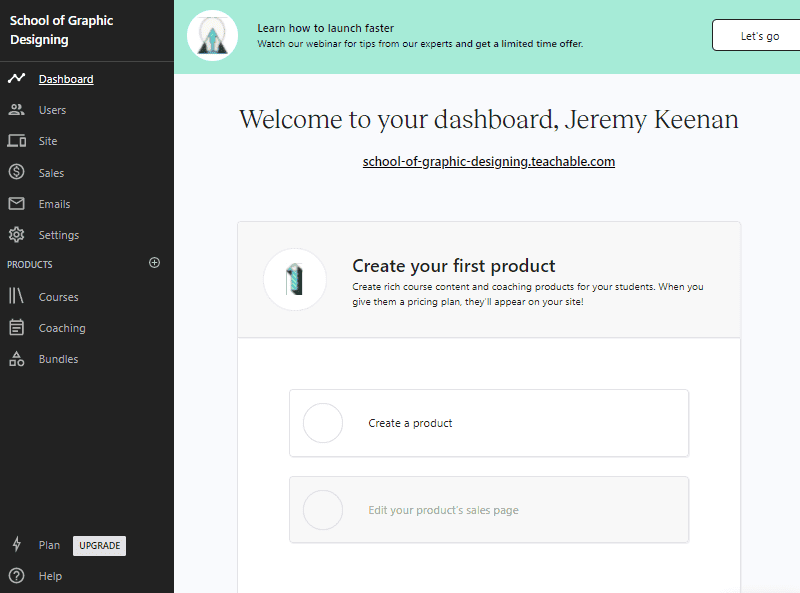
The dashboard consists of lots of menu options on the left sidebar from where you can carry out all the operations like creating courses, designing landing pages, setting up marketing, etc. While on the center, you can see your website’s domain and the shortcut to create a product.
Create a Course
Now, you can go ahead and create a course. Either click on the shortcut on the dashboard’s center or click on Courses at the left sidebar.

Now, if you click on the Courses, then on the next step, click on the New Course button.

Next, the process of creating a course takes a few steps. So, we have broken them down.
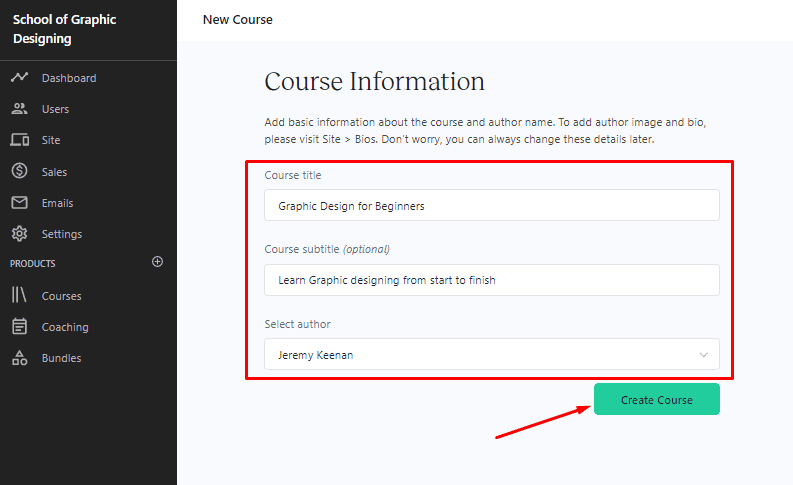
Enter Course Information
It requires you to fill in 3 basic details.
Enter Course Title– Enter the title of your course
Enter Course Subtitle– Add a description or some additional information about the course.
Select Author – It has a dropdown to select the author that you want the course to assign to. However, it requires you to upgrade to any of the Teachable paid plans to add team members and access this feature.
You can also change all of these entered details later as well.
After done, click on Create Course.
Add Sections and Lectures
The course on Teachable is divided into Sections and Lectures which can be understood as the main topic and sub-topic that comes under it.
Now, the next step is to add Sections at first, and then a number of Lectures for each Section.
You can see that there is already a Section and a Lecture created for you. You can either delete them or edit their names by clicking on the pencil icon.

Anyway, to add a Section, just click on the New Section button at the top.
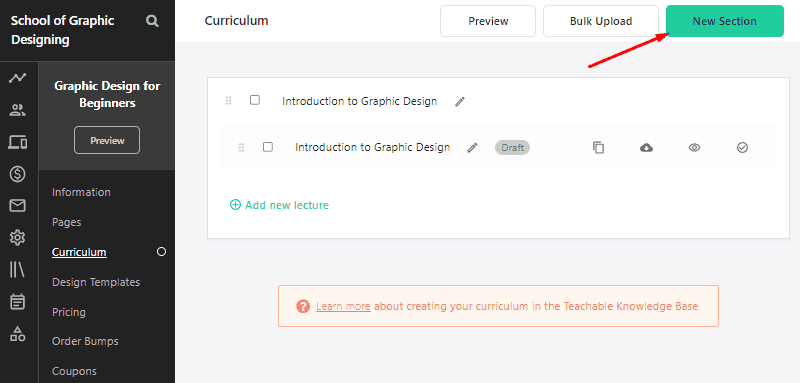
In a similar way, we have added some Sections.
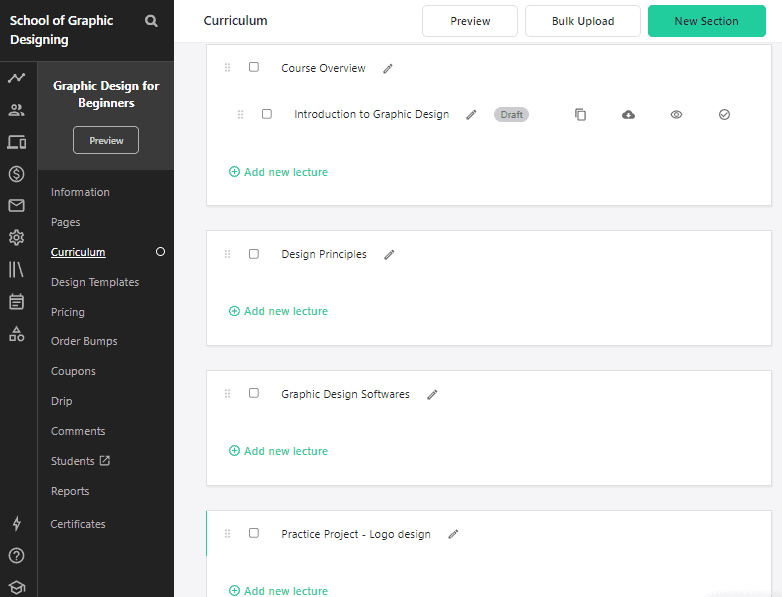
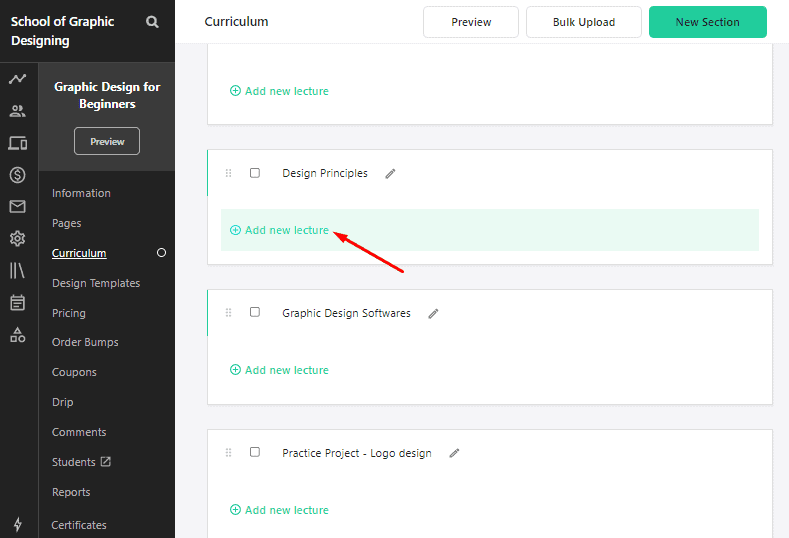
Now, let’s add some Lectures. For that, click on the Add New Lecture link below the Sections.
We have added some lectures for 2 different Sections as you can see.
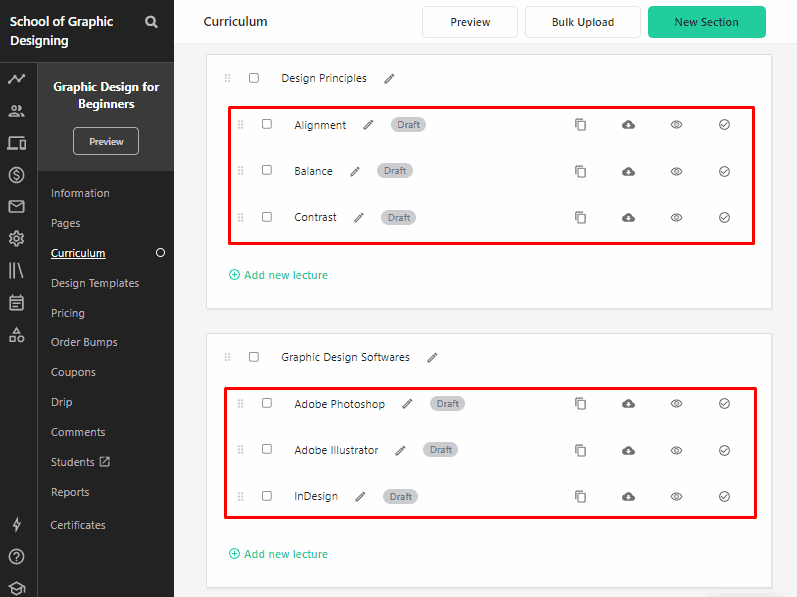
In case you have misplaced some sections or lectures, you can arrange them using the drag-and-drop feature provided by Teachable. It’s easy – just click on the dots and drag the items in any order you like.

Add Course Content
The main content of the course goes inside the Lecture elements of the course.
To add the course content, just click on the name of the Lecture and it will open the space to add the content.

As you can see on the dashboard, you can add different types of data, namely – file (audio, video, PDF, etc.), text, quiz, code, etc. You can add upsell as well but requires upgrading your plan.
Anyway, click on whatever you want to add.
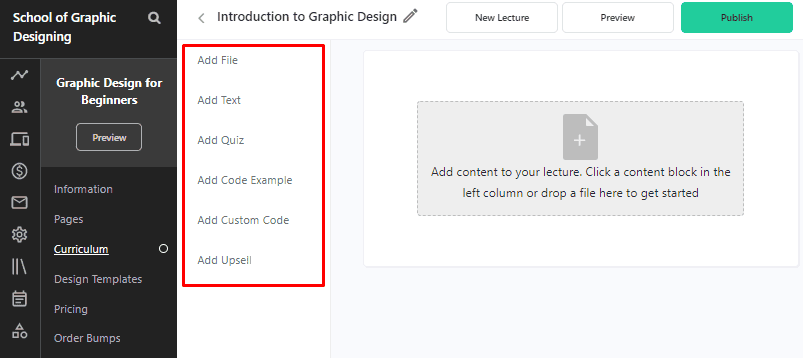
Mainly, you might want to add a video i.e. the most popular and suitable type of content for online courses. So, you should select the Add File option from the list of content types. It is selected at default as well.
To add videos or any file, click on the content block and upload manually from your local device, Google Drive, Dropbox, OneDrive, etc. Or, you can directly upload videos by dragging them from your device. It is demonstrated below.

Furthermore, you can add thumbnails and subtitles for the video files to enable downloading, etc. Also, you can add other types of content for the same lecture as well.
And after done, you can view the course with the Preview button or publish it with the Publish button.

This doesn’t mean that the course is live yet – it just ensures that the uploaded content for the lecture is saved.
Next, you can go back to the curriculum and add more course content for each lecture in a similar way.
Use Options for the Lectures
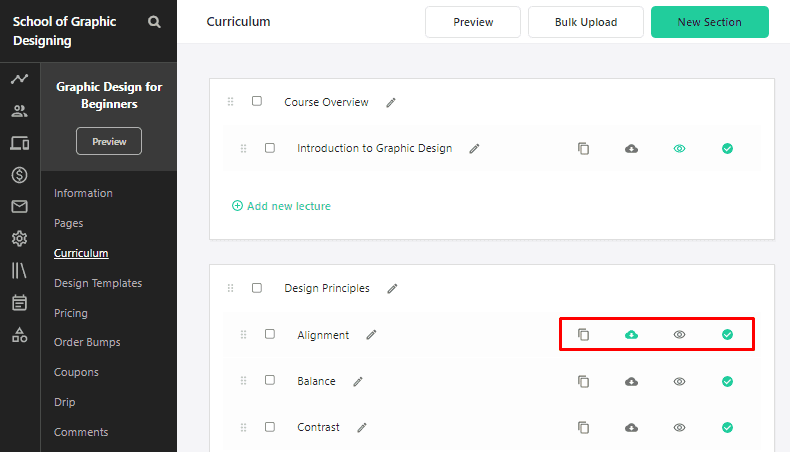
Now, if you head back to the main curriculum, you can see some options for the Lectures. Let’s see what they are and how can they come in handy.
- Duplicate – It creates a copy of the lecture in the same section.
- Make Downloadable – Enabling lets users download the files like video, PDF, audio, etc. on the lecture.
- Free Preview – It lets students view the lecture for free.
- Publish/Unpublish – With it, you can publish or unpublish the lecture with a single click.
Add Pricing
After you have created the course and added content, the next step is to add pricing for the course.
To start, click on Add a Price at the bottom. Then on the next page, click on Add Pricing Plan.

It opens a window where you can choose the type of pricing for the course. As already mentioned, the options are – free, one-time purchase, payment plan, and subscription.

So, click on any of the methods you want for the course.
For now, we have selected one-time purchases (users can purchase the course once at a certain price).
After selecting, it opens the window for adding the price with other details and descriptions which you will have to fill accordingly. See the image below for example.

After that, click on the Add Pricing Plan button. After that, it will take you to the page consisting of the created pricing plan.
From there, you can also add some other plans for the same course as well. Just click on the Add Pricing Plan button and go through the same steps as before.

Publish the Course
Now, let’s publish the course.
So, go to the Information from the course builder menu.

Now, before publishing the course, you might want to also upload a course image and check the course details by scrolling down.

After everything is in place, click on the Publish Course button.

This is how it looks like on the students’ screen after purchasing.
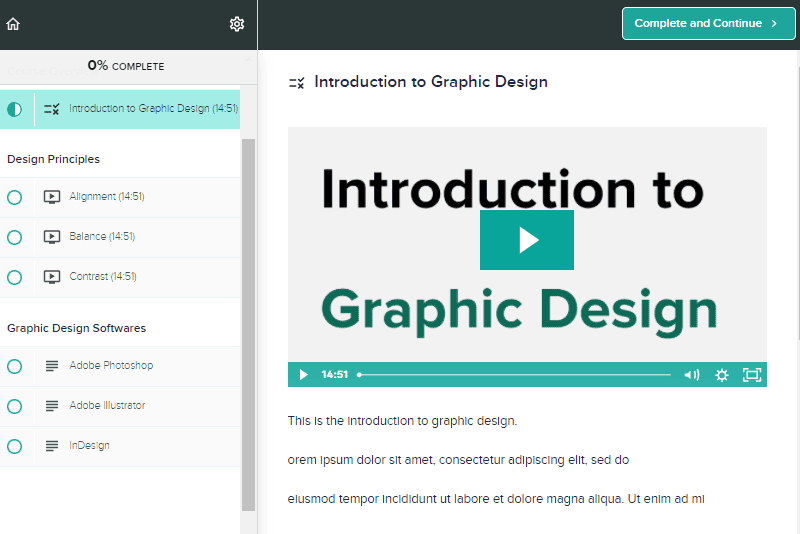
So, these are the simple steps for creating and publishing a course on your Teachable account.
The course interface looks pretty basic right now. It’s because we haven’t done customizing the appearance of the course player. IF you want to edit it, you can change the layout, colors, fonts, etc. as you like from the dashboard menu.
Here, we are only scratching the surface. You can do a lot of things as you finish publishing your first course.
We recommend you navigate through the entire dashboard and customize your online course portal to make it look the best. You can try changing the domain name, uploading branding images, changing colors & typography, creating landing pages, etc.
Online Courses created with Teachable
Following are some of the websites created with teachable –
The School of The New York Times
It’s an online school or an e-learning platform by The New York Times, a popular newspaper-based American media. The platform was created to spread the knowledge and practices at The New York Times.

I Can Make Shoes
I Can Make Shoes is an online portal that teaches beginners how to make shoes.

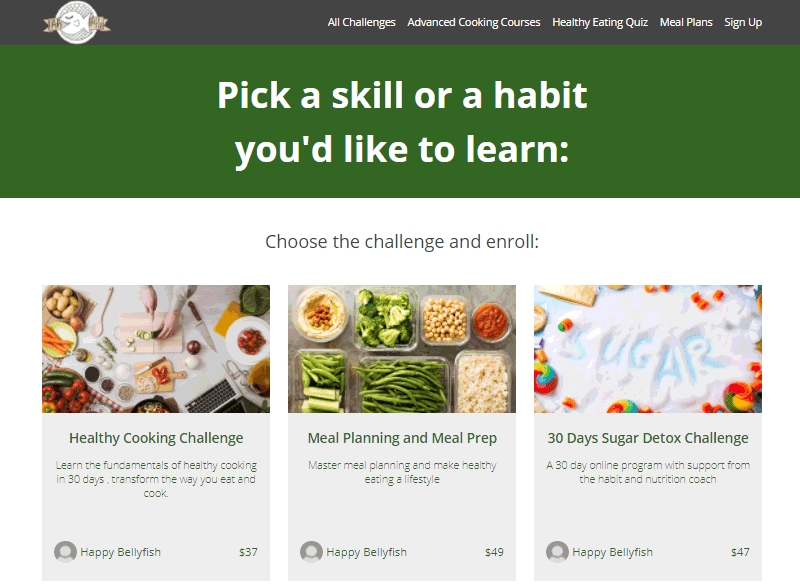
Happy Belly Fish
Happy Belly Fish is a website that provides resources for healthy cooking, eating, and healthy life. It also has a complete Teachable online school offering lots of cooking courses and courses on improving lifestyle with food.
Sketch Master
Sketch Master is another great example of a learning platform created with Teachable. It lets students sign up and enroll in courses relating to designing and sketching.

BOUQ Paper Flowers
It’s a complete online learning platform for teaching enthusiasts, designers, and decorators on creating flowers in papers with instructions, guidance, and support.

Teachable Pros and Cons
Next, let’s look at the pros and cons of Teachable.
Pros
- Feature-rich free plan
- Unlimited free courses
- Clean user interface
- Drag-and-drop editor
- Affiliate tracking and automatic affiliate payouts
- In-depth analytics with in-built tools and Google Analytics integration
- Offers advanced APIs, integrations, and webhooks
Cons
- Higher transaction fees – up to 10% + $1 on the free plan
- Mobile application for iOS only
- Limited multi-lingual support
- Fewer email marketing software integration
- Not the most seamless user experience for students
Teachable User Reviews

Simply Awesome
Great Experience. Only platform I recommend to host your courses.

Great product
Great product, great support, very easy to manage courses, great interactive tools.

One of a kind Platform
Teachable Platform is beginner friendly and their support is excellent.

Customer service experience was fast!
Customer service experience was fast! As far as customer service response and identifying issues go, I haven't had any problems with Teachable. I was first drawn to it through Arlan Hamilton, a west coast VC, that used it to create her own courses. She said it was pretty easy, and gave us a few tips. I decided to launch my own very first course (and school), and once I got the hang of everything, it went pretty seamless. Adding new features was easy, and I contacted customer service and got a prompt response in days with the problem resolved! Real people are behind the scenes, which is a refreshing change. Highly recommend to anyone looking to start their own online course journey.

No problems with the site
No problems with the site. Very user friendly

Ease of Business
In 10 minutes I started an online business, verified it, linked it to my bank account, and got a payment page to share with my customers:)

This platform is everything I need
This platform is everything I need. A beautiful website, and my course portal. It’s also where people can find my latest coaching packages and offerings. I love the customization options that help my Teachable feel like me. Also, Teachable is extremely user friendly, which is super important to me, being that I struggle with tech. Everyone who has visited my Teachable website has loved it.

Great Onboarding
Tons of help from people that work at Teachable makes it a great platform. They have invested time, money and effort to make sure every subscriber to Teachable can succeed. Really an exceptional approach to onboarding new customers.

Everybody was super knowledgeable and…
Everybody was super knowledgeable and helpful with that knowledge!
Teachable Pricing

Being a freemium tool, Teachable has both free and premium versions. The free version comes with surprisingly good features like unlimited courses, unlimited video hosting, quizzes, design templates, etc. But, it cuts 10% + $1 for every course you sell.
To avoid the pay cut, you can opt for one of the paid plans. Also, it adds up advanced functions for creating a better online school. Of course, the features come upgraded as you move to the higher plan.
The paid plans start at $29 per month. And, here is what the Teachable paid plans look like briefly.
- Free: $0 | $1 + 10% transaction fee | 1 admin
- Basic: $29 | 5% transaction fee | 2 admin
- Pro: $99 | no transaction fee | 5 admin
- Business: $249 | no transaction fee | 20 admin
| Plan | Price | Admins | Transacton Fee |
|---|---|---|---|
| Free | $0 | 1 | $1 + 10% |
| Basic | $29 | 2 | 5% |
| Pro | $99 | 5 | no transaction fee |
| Business | $249 | 20 | no transaction fee |
Teachable Alternatives
Teachable is surely a good solution for creating online courses. But, it is certainly not the only one out there.
There are lots of tools that let you open your own online school, membership portals, and teaching hubs. They may have the same goal but could differ from Teachable in terms of features availability, ease-of-use, pricing, support, etc.
So, let’s see some of the popular competitors of Teachable.
Thinkific
Thinkific is a user-friendly LMS platform for creating, publishing, and selling online courses seamlessly with offered tools, features, and integrations.

It offers lots of online course platform features like drip, quizzes, coupons & promotions, affiliates, user & team management, payment methods, third-party tools integrations, etc.
Like Teachable, it also offers a free plan, but you can have only 1 course there. However, Thinkific charges you no transaction fee on any plan.
Kajabi
Similarly, Kajabi is a robust tool for creating a total online portal for creating not only online courses but also offering coaching, membership, podcasts, communities, etc.
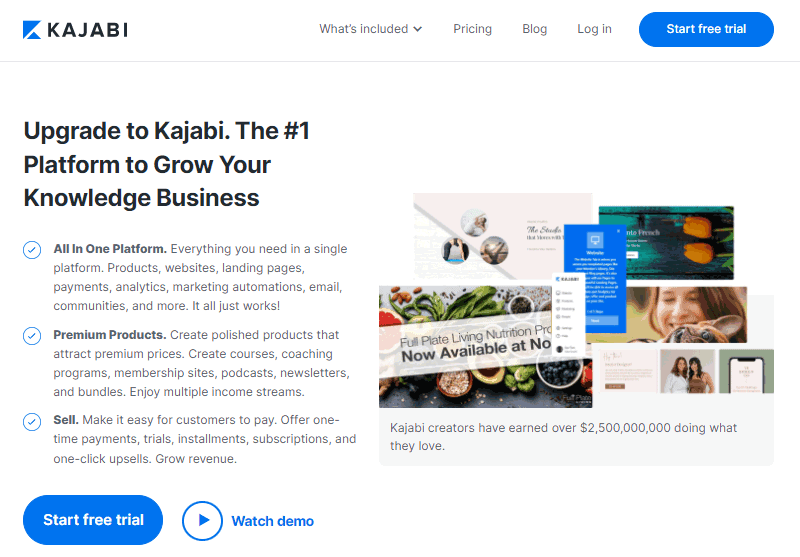
Actually, Kajabi is more than just a course platform – it provides an all-in-one solution for creating a digital product platform with websites, landing pages, marketing, pipelines, analytics, email, automation, upsells, etc.
It doesn’t offer a free plan, but a free trial of 14 days, sign up using this link to get an extended 30 day trial instead. The price for its plans is quite high compared to Teachable but has lots of advanced features nonetheless.
We have a detailed Kajabi review that you should definitely check out for finding out more.
Podia
Podia is a platform that lets you create a digital store and focuses on selling 4 main products – courses, webinars, digital downloads, and community.
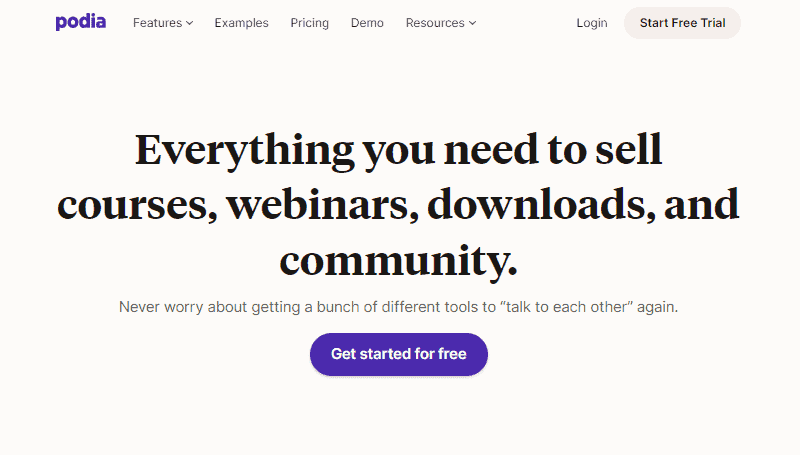
For creating and selling the products, it has offered features like custom domain, email marketing, live chat widget, affiliation, bundles, Zapier integration, branding, custom coding, etc.
Like Kajabi, it doesn’t have a free plan, but lets you use the platform for 14 days as a trial. And, the starting plan is quite affordable.
Conclusion
To summarize this review, Teachable is the best fit for absolute starters looking to create and launch their first online courses with basic features and spending minimum.
The platform has the built-in features for uploading courses, creating landing pages, email marketing, affiliation, handling payments & refunds, etc. all in a super-easy dashboard, you don’t feel any technical hassle.
Among the provided features, clean interface, ease of use, free plan, unlimited video hosting, unlimited products, integrations, etc. are some of the unique selling features of Teachable.
Or, if you are looking for other options too, then check this Thinkific review or the list of top online course platforms.


